by Jacqueline Gikow
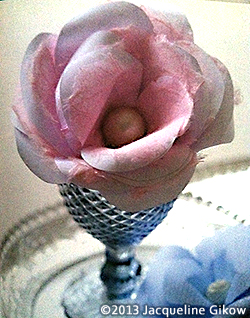
A cabbage rose corsage.
There are two versions of these roses. It’s important that you choose the right paper for the right technique. This corsage works best when you use a combination of plain white paper and a thin, textured, pastel paper. Additionally, it helps if, when you have to make a fold that you use a folding tool to smooth the crease down.
Materials and Supplies
White paper (approx. 120gm)
Textured light weight pink paper
Sharp, pointed scissors
Paintbrush and water
Thin tube or knitting needle
White (PVA) glue
Toothpick
Mat varnish and paintbrush (optional)
Fixative
Pearl or papier-mache bead
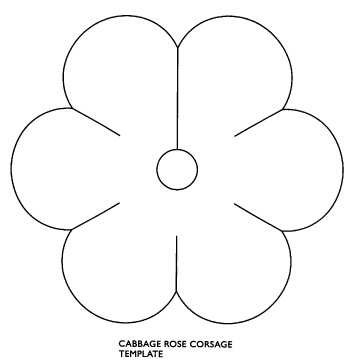
1. Photocopy the template and enlarge it to five inches and cut three shapes from the white paper.
2. Make three rough edged shapes from the pink paper by drawing the template outline onto the paper with water and gently tear it to give a soft edge.
3. Curl all the petals outward. With the right side of the paper facing up, place the tip of each petal around a slim tube and roll it away from you using your thumbs and forefingers. If you use a knitting needle make sure it isn’t too long or it will be awkward to use.
4. Position the pink shape on top of each white paper shape. Spread a little glue around the central holes and glue each pair of papers together.
5. Form one shape into a wide cone. Pull the shape open a little at the split and put some glue on the bottom third of the back o f the paper. Pull it inside to overlap by one and a half petals to form a cone. Hold it firmly for a moment until the glue sets.
6. Assemble the cones without gluing first so you can choose the best arrangement for the petals. Then put some blue around the bottom third of the tightest cone. Repeat the procedure into the largest cone. Push the petals together into place firmly with a pencil. Trim the petals if necessary to neaten.
7. The flowers can be awkward to varnish and some papers may be too absorbent. Experiment with matt varnish on the papers first. If you have problems, use an artist’s fixative spray to give it a little protection. Let dry
8. Cut the bottom of the rose a little flatter. Glue a pearl or papier-mache bead to finish the center. Attach a brooch finding to the back center.
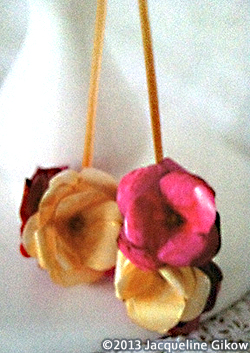
A posy choker.
Materials and Supplies
White paper (approx. 120gm)
Toothpick
White (PVA) glue
Sharp, pointed scissors
Thin tube or knitting needle
Nail polish in various colors
8 seed beads
Metal choker
Beading thread and needle
Thin, gold satin ribbon

1. Photocopy the template. Enlarge or reduce it to 1 1/2 inches and cut 16 shapes from the white paper. Each flower will take 16 shapes.
2. Make a flower: Curl all the petals outward. Roll the tip of each petal around a toothpick and roll it away from you using your thumbs and forefingers. Form one shape into a wide cone. Pull the shape open a little at the split and spread some glue on the bottom third of the back of the paper. Pull it inside to overlap by one and a half petals to form a cone. Hold it firmly for a moment for the glue to set. Form the second shape into a tighter cone of overlapping three and a half petals.
3. Assemble the cones without gluing first so you can choose the best arrangement for the petals. Then add some glue around the bottom third of the tightest cone and inert into the other one. Make seven more flowers.
4. Coat the flowers, front and back, with nail polish. Use thin coats and do a second coat if necessary.
5. Make a posy of five flowers. Arrange five flowers in a circle with a bead next to each. Make sure the beads are larger than the holes in the flowers. Leave a tail of 2 3/4 in and thread up from the bottom of the first flower; pick up it bead and take the thread back down through the central hole. Move onto the next flower and repeat for the remaining three flowers.
6. Use a couple of stitches and sew one end of the ribbon close to the fifth flower. Pull the threads gently to raw the flowers together into a ball and the ribbon end will hide in the middle. Tweak the flowers into a good shape and tie a firm knot to hold them in place. Dab some glue on the knot and trim the threads.
7. Make a three-flower posy in the same way at the other end of the ribbon. Make a loop over your choker and pull the two posies through.
Related Articles
Quilling: Make a Quilled Millefiori Butterfly Brooch | How to Make Rolled Paper Beads | How to Make Metallic Paper Beads
![]() How To Make Diamond-shaped Earrings Out Of Beads
How To Make Diamond-shaped Earrings Out Of Beads
How to make diamond-shaped earrings out of beads using a Brick Stitch.
![]() How to Create a Bracelet with a Sliding Clasp
How to Create a Bracelet with a Sliding Clasp
Tutorial that shows you how to create a square knot sliding clasp for jewelry.
![]() How To Make A Dream Catcher For A Child
How To Make A Dream Catcher For A Child
Step-by-step instructions for how to make a Dream Catcher.
![]() Create a Fun Flower-Pot out of a Plastic Cup
Create a Fun Flower-Pot out of a Plastic Cup
A fun flower-pot project great with or without children.
![]() How To Make A Plastic Bottle Bird House
How To Make A Plastic Bottle Bird House
A simple bird house using a plastic bottle that costs next to nothing to make.