by Jacqueline Gikow
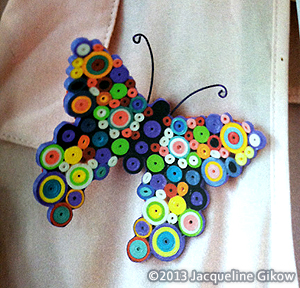
A quilled butterfly.
Arranging coiled strips of paper into patterns has been a pastime for centuries. Today you can buy special tools and pre-cut strips in an amazing riot of colors or cut your own paper and use toothpicks and thin tubes.
A little paper goes a long way and you can buy the paper strips in packs of single colors or multiple colors. The strips come in three widths and a variety of lengths. There are also different finishes and effects. As an alternative you can cut your own strips, but you must be very accurate.
Coil and arrange your paper into the design of your finished piece before you glue them into position. Remove a couple of coils at a time and glue them before pushing them into position. Be sure to glue a coil where the end of the coil is hidden so it looks as neat as possible.
Varnish the coils several times since it protects and helps to strengthen them. Make sure the colors don’t bleed. Closed coils will probably have a small hole in the middle. To make an open coils, place the closed coil and it will uncoil itself. You can do this by eye or use a circle guide.
Materials and Supplies
Pencil and paper,
1/8in (3mm) wide scraps of different-colored-quilling paper
Quilling tool or toothpick
White (PVA) glue
Sharp pointed scissors
Colored cardstock
Craft knife and cutting mat
Decoupage gloss varnish and paintbrush
Scraps of thin wire
Round-nose jewelry pliers
Brooch finding
1. Draw a butterfly shape on a piece of paper
2. Make a lot of closed coils in different sizes and color combinations, but make sure there are two of every motif so you can make the butterfly wings a mirror image of each other. Choose a simple color combination for the wings and four closed coils for the body.
3. Fill the butterfly shape with the coils, matching the left wing to the right. Bring the coils right out to the sides so they come over the edges a little. Continue until the butterfly is complete. Make some smaller coils in case you need a few extra.
4. Cut a butterfly shape out of colored cardstock and score lightly around the body from top to bottom on the underneath side of the cardstock. Gently fold the wings upward a little. Start by spreading some white (PVA) glue onto the cardstock body and glue on the body coils. Put a dab of glue on the sides of the coil where they touch each other.
5.Transfer all the coils from the paper shape onto the cardstock shape, a few at a time. Spread white glue on the cardstock first and add a dab of glue on any side of any coils that touch another coil. Dab white glue around the shape to prevent any coils from falling off. Ease the paper strip around the shapes with a toothpick.
6.Pull the wings up a little and balance them on jar lids, pushing the body down gently. Then varnish several times with decoupage gloss varnish and let the butterfly dry.
7. Make two antennae out of thin wire. Twist the end of each wire using a pair of round nose jewelry pliers. Make a rounded end out of each piece of wire. Glue the antennae to the underneath of the brooch. Attach the brooch finding using the white glue.Related Articles
How to Make Rolled Paper Beads | How to Make Metallic Paper Beads
![]() How To Make Diamond-shaped Earrings Out Of Beads
How To Make Diamond-shaped Earrings Out Of Beads
How to make diamond-shaped earrings out of beads using a Brick Stitch.
![]() How to Create a Bracelet with a Sliding Clasp
How to Create a Bracelet with a Sliding Clasp
Tutorial that shows you how to create a square knot sliding clasp for jewelry.
![]() How To Make A Dream Catcher For A Child
How To Make A Dream Catcher For A Child
Step-by-step instructions for how to make a Dream Catcher.
![]() Create a Fun Flower-Pot out of a Plastic Cup
Create a Fun Flower-Pot out of a Plastic Cup
A fun flower-pot project great with or without children.
![]() How To Make A Plastic Bottle Bird House
How To Make A Plastic Bottle Bird House
A simple bird house using a plastic bottle that costs next to nothing to make.