by Jackie Villegas
Twine is a wonderfully versatile craft material that you can use to hang mobiles, string ornaments, wrap vases and bottles, tie packages, make banners, and form pompoms - and these are just a few of its countless uses. Making twine flowers is something you can do with older children, those who are already quite dexterous and able to sit down for long periods. If you think the process may be too tedious for the kiddos, set up the cardboard-and-pin guides beforehand and immediately engage them in looping the twine.
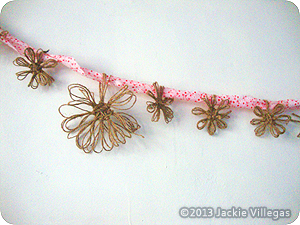
Use these twine flowers as gift or loot bag toppers, greeting card accents, scrapbook embellishments, and party decor. Make several to form wreaths, table arrangements, and wall art. The possibilities are endless!
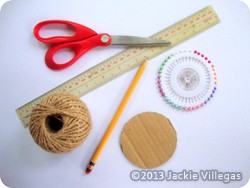
1. Cut out two circles from an illustration board or cereal box.
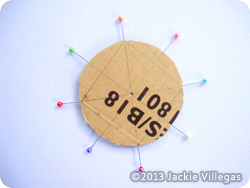
2. Get your pencil and ruler and draw four intersecting lines on one of the circles, dividing it into eight sections.
3. Glue the two cardboard circles together, keeping the lines on the outside.
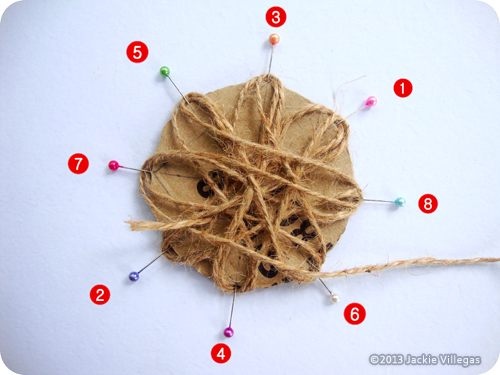
4. Once the glue has dried, stick the pins between the two pieces of cardboard. Use the lines as insertion points.
 |
 |
5. You can skip steps #1 and #3 if you’re using foam or a corrugated fiberboard box (as we did). Just draw the lines and use them to guide your pins.
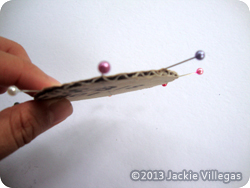
6. Get your twine and start winding it around the pins. First, take one end of the twine and hold it to the center of the cardboard with your thumb. Then, wind it around pin #1, take it back down across the center and wind it around the opposite pin, which is #2.
7. From #2, take the twine across the center again and wind it around the pin to the left of #1, which is #3.
8. Make a loop around #3 and then take it across the cardboard and wind it around #4. Continue this pattern, looping around #5 and then #6, #7, and finally #8.
9. Once you’ve gone around all the pins, repeat the process so that there are two loops around each pin.
10. When you’re done, cut the twine, leaving about 12 inches so you can secure the loops.
11. For this step, you can thread a craft or darning needle onto your twine OR you can simply thin and stiffen the end of the twine by dabbing some glue onto it and then waiting for it to harden before snipping off the tip at an angle.
12. Secure each loop you made. If you ended at #8, take the twine under the four loops you made there, and then over it, and then under again, making two stitches to secure the petal. Move your twine under the next petal and repeat the process. Keep doing this until all the petals have been tightly secured.
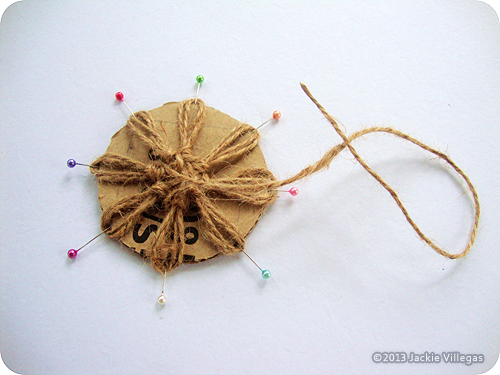
13. Take the remaining twine under and over the stitches in the center to secure it. Do this twice and then cut off the remaining twine.
14. Remove the pins.
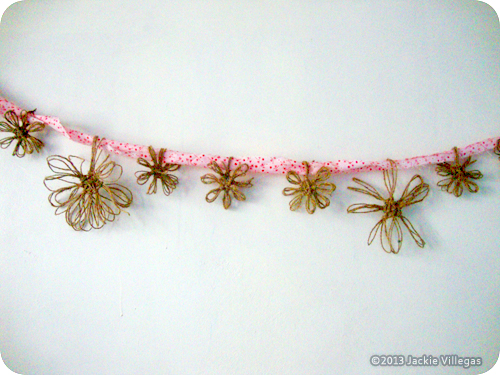
15. Make as many twine flowers as you need and then get some string, ribbon, cord, yarn, or a strip of fabric (like we used) to make a twine flower bunting.
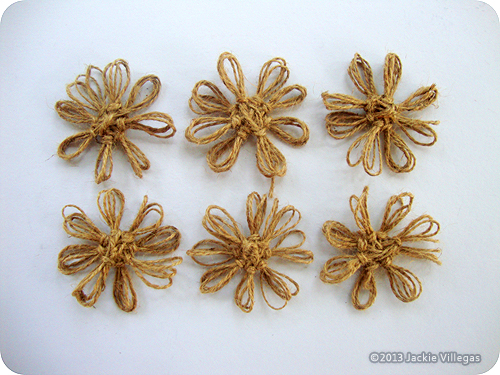
For this tutorial, we used eight pins to make eight petals for each flower, but you can use more to make your flower look lusher. Because we had some cardboard circles already cut out from a cardboard stove we made, we used those as well to make some extra-large twine flowers. The bigger the flower, the more petals it should have and the more loops you should make around each pin.
You can use embroidery thread or dyed twine to make flowers of different colors. Or follow the procedure above to make fabric flowers that you can use to jazz up old shirts, skirts, bags, and pillow cases. You can even experiment with different materials such as wire and craft paper to make cute little brooches and lapel pins.
Related
![]() How To Make Diamond-shaped Earrings Out Of Beads
How To Make Diamond-shaped Earrings Out Of Beads
How to make diamond-shaped earrings out of beads using a Brick Stitch.
![]() How to Create a Bracelet with a Sliding Clasp
How to Create a Bracelet with a Sliding Clasp
Tutorial that shows you how to create a square knot sliding clasp for jewelry.
![]() How To Make A Dream Catcher For A Child
How To Make A Dream Catcher For A Child
Step-by-step instructions for how to make a Dream Catcher.
![]() Create a Fun Flower-Pot out of a Plastic Cup
Create a Fun Flower-Pot out of a Plastic Cup
A fun flower-pot project great with or without children.
![]() How To Make A Plastic Bottle Bird House
How To Make A Plastic Bottle Bird House
A simple bird house using a plastic bottle that costs next to nothing to make.