by Jacqueline Gikow
A beginner working with clay can have a lot of fun making a set of ceramic dinner plates. It is also easy for a more skilled student to design an attractive, decorative plate. Making a plate is a simple and original approach using clay slabs that are great surfaces for decoration. Materials are uncomplicated, economical and easily accessible.
You can quickly learn how to roll out a smooth slab, and practice understanding various stages of raw clay as well as how to handle the clay at each step. Start by making one plate to get the feel of your activity. Afterwards you can make a series of plates and you’ll have a set of plates for your own use or for giving as gifts.
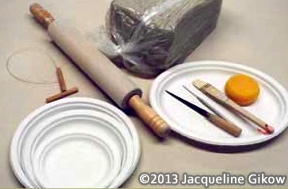
Note: Chinet® plates do not have a plastic coating and absorb moisture from the clay. This helps the clay to release from the plate mold as it dries. Avoid coated and plastic plates.
Roll a slab out to ¼ to ½ inch thick. Use a wood rolling pin to roll the clay out. Roll the slab a few times on one side. Then turn it over and roll the clay two or three more times. Make sure the clay doesn’t stick to the cloth you’re working on. Cautiously lift and turn the slab over and roll it untill it is the right thickness. Let the slab harden to a pliable leather-hard quality. The clay should bend without cracking and you don’t want to show fingerprints.
Use a paper plate as a mold to create a round plate. The supermarket has different sized paper plates to use as templates. Choose a paper plate that is thick rather than thin and be sure it is not coated or plastic. Turn the paper plate upside down and use it as a pattern for cutting the clay around the paper plate. Use a needle tool or a fettling knife to cut your clay.
Turn over the round clay slab, smooth the top edge and drape it into the paper plate. Press the clay into a paper plate with your hands or sandwich the clay between two plates.
Let the plates dry so they are leather-hard in the paper plate. Remove the clay from the mold to check to make sure the plates sit flat on the surface without rocking. Do any smoothing of the rim of each plate.
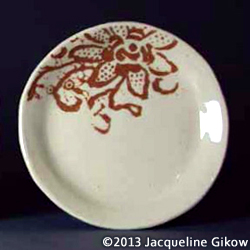
Plates can be decorated in many approaches when it is leather-hard, greenware or bisque stages. You can decorate the flat surface with a painterly method, a decorative underglaze, or glaze work.
Slip decoration provides dimension to a plate and students can draw their original designs on the clay surface. You can also use found and inexpensive materials to create a design in a contrasting color slip to emphasize the design. You can also make paper stencils and paint with decorative slip to create graphic borders or designs for your plate.
After you drape the clay into the paper plate mold you can use paper stencils when the clay gets to be leather-hard. Each paper stencil can be used twice easily. Store a copy of the original design. Trim the stencils to about 2 inches of paper around the design. Saturate the paper stencils with water until wet but not soggy. Place the stencils onto a paper towel to remove excess moisture. Position the stencil on your plate and press it down with a damp sponge. Paint slip over the design, then carefully remove the paper stencil. If you are making a set of plates, sometimes the stencil can be transferred to the next plate and pressed with a sponge.
Related articles
![]() How To Make Diamond-shaped Earrings Out Of Beads
How To Make Diamond-shaped Earrings Out Of Beads
How to make diamond-shaped earrings out of beads using a Brick Stitch.
![]() How to Create a Bracelet with a Sliding Clasp
How to Create a Bracelet with a Sliding Clasp
Tutorial that shows you how to create a square knot sliding clasp for jewelry.
![]() How To Make A Dream Catcher For A Child
How To Make A Dream Catcher For A Child
Step-by-step instructions for how to make a Dream Catcher.
![]() Create a Fun Flower-Pot out of a Plastic Cup
Create a Fun Flower-Pot out of a Plastic Cup
A fun flower-pot project great with or without children.
![]() How To Make A Plastic Bottle Bird House
How To Make A Plastic Bottle Bird House
A simple bird house using a plastic bottle that costs next to nothing to make.