by Jacqueline Gikow
Basic clay handbuilding techniques are described below.
Working with clay is an art form like no other. It is a combination of disparate experiences that has been literally irresistible for centuries. Whether you’re shaping moist clay into a simple cup, or building a complex sculpture, the act can be as sensual as massage or as challenging as tying shoelaces. Handbuilding, which is working without a potter’s wheel, can be the most rewarding place for beginners to start. Novice handbuilders can achieve elegant results fairly quickly, with few tools and very little practice.
Clay varies in its qualities, each distinctive in texture and finish. For example, when working on a small or finely-detailed piece, you might use smooth clay with little grit (also called “grog”) or sand. On the other hand, a larger hand-built piece, where you are not adding a lot of detail, or if you are adding different thicknesses of clay to an armature or support, you would most likely use a clay with more grog content.
Premixed clay is packaged either in hard or soft quality, which correlates to your project needs. If you are working with small children you might want to use soft clay. On the other hand, if you are working with older children or adults, they will be able to manage firm clay, which also produces fine details.
When it dries, and is fired, clay will shrink more or less depending on the different types of clay mixed together. Experienced potters are often able to compensate for this happening; however, if you are unfamiliar with clay, you might look for clay with low shrinkage.
Clay also comes in different colors - buff, brown, red or terra cotta, and white clays are the most prevalent. You can use the color of the clay as a way to change the effect of a glaze or paint application.
Finally, clays are also distinguished by whether they are low or high-firing. High-fire clays are more durable, but more difficult to work with. So for school or hobby work, low fire clays are more appropriate and forgiving. Unfortunately, low-fire clays may be more fragile and less useful for oven or bake ware use.
Modeling & Pottery Clays
As a rule, modeling clays are meant for hand building, while pottery clays are meant for wheel work, sculpture and some hand building. When working with modeling clay on a pottery wheel, use extra water, and a wet chamois to help reduce the amount of friction that results.
Non-Kiln Fired Clays
There are variety of alternatives available to using traditional pottery, modeling and sculpture clays. These clays are useful for schools and for beginning artists where the use of a kiln might be problematic, or too costly. Non-kiln fired clays come primarily two types; oven-bake and air-dry.
Oven-bake clays tend to look and feel the same as kiln fire clays except once dry, they are cured by baking them in a household oven. Take a look at the packaging to find the temperature to use. It is also important to seal the finished piece with a clear coating if you want it to be waterproof. Air-dry clay is just as it is named - it is finished when dry. There is no heat needed.
Non-traditional clays are usually more expensive than regular clays. This is compensated by the fact that you do not need kiln facilities or knowledge of the glazing process. As a result, these clays can be a convenient way to introduce people to small 3-D projects, because you can concentrate on the creative process.
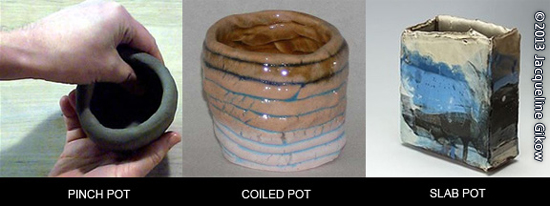
"Handbuilding" means working with clay by using simple tools and your hands, not the pottery wheel. Below are three of the most common forms of creating hand built pots: pinch pot, coiling and slab techniques. Most people don’t appreciate the endless world of hand building and the artistic possibilities it offers.
PINCH-POTS:
It’s easy to make a lumpy pinch pot, but with a little practice you can create some beautiful and interesting forms that are almost impossible to make with any other process.
Pinch pots are some of the simplest and most direct of hand building with clay. Any clay works as long as it is soft and pliable. A variety of shapes can be produced by gently rotating the ball of clay in one hand while the thumb and fingers of the other hand thin and shape the wall. Try to keep the tops of the pinch pot even. If the rims of a pinched pot develop in an uneven manner it’s absolutely normal, but if you want an even top you can use a potter’s knife to cut the uneven parts.
When you finish your form, let the clay dry until it is “leather hard,” (when it is still moist, but firm). You may have to cover it with a damp cloth or plastic sheeting and leave it to sit overnight to prevent it from drying too quickly.
COIL BUILDING:
Many of the most beautiful pots, from all parts of the world and from many historical periods, have been made by the coil method. Coiled vessels can be made either from a long, round rope or flat strips of clay and can be open or closed. The more careful and skillful you are with this technique, the more difficult it will be to identify the process, unless you desire it. Whether you smooth the clay, texture or embellish it, there are a many ways to approach the coiled vessel as a blank canvas.
Wrapping a rope of clay around itself, stacking the coils to build height, forms coiled pots. To make the coils, you roll the clay out on a flat surface while exerting pressure with your fingers. The diameter of the clay coils will depend on the size, use, and desired appearance of your project.
Rolling out a piece of clay and shaping it in a round form can make a clay base. Start attaching coils to the base by pressing them onto the base and stacking them onto one another. If you want a swelled shape place each coil slightly on the outer edge of the one below it. It usually takes more than one day to form a coiled pot.
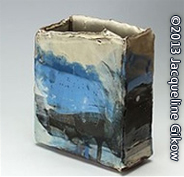
SLAB BUILDING:
Sheets or slabs of clay used to form objects offer large surfaces that give considerable potential a they lend themselves to almost every decorative technique.
Slabs can be rolled individually, with the clay placed on a piece of fabric to prevent it from sticking to the work surface. A rolling pin is used to ensure an even thickness. The slab should be turned regularly, and rolling should be done from the center outward, allowing the clay sheet to spread more easily.
Clay slabs can’t support themselves when they are soft and pliable, and should be formed around molds of some sort. For example, cylinders can be formed by simply wrapping a pliable clay sheet around a tube or rolling pin.
If left until leather-hard, clay labs can be cut and joined. Clay slabs to be joined should be carefully scored and then have stiff slurry applied. After this is done a clay coil should be blended into the joint.
For all handbuilding, over-manipulating clay destroys the crispness of its texture and gives the clay an overworked look. Also, keep your work surface clean. One of the most important lessons you should learn is to know when to stop. Keeping a project simple is often the best rule and not just for beginners.
Related Articles
Polymer Clay Basics | How to Make a Polymer Clay House Necklace | Make Faux Ivory Buttons | Precious Metal Clay
![]() How To Make Diamond-shaped Earrings Out Of Beads
How To Make Diamond-shaped Earrings Out Of Beads
How to make diamond-shaped earrings out of beads using a Brick Stitch.
![]() How to Create a Bracelet with a Sliding Clasp
How to Create a Bracelet with a Sliding Clasp
Tutorial that shows you how to create a square knot sliding clasp for jewelry.
![]() How To Make A Dream Catcher For A Child
How To Make A Dream Catcher For A Child
Step-by-step instructions for how to make a Dream Catcher.
![]() Create a Fun Flower-Pot out of a Plastic Cup
Create a Fun Flower-Pot out of a Plastic Cup
A fun flower-pot project great with or without children.
![]() How To Make A Plastic Bottle Bird House
How To Make A Plastic Bottle Bird House
A simple bird house using a plastic bottle that costs next to nothing to make.