- MONKEYDOIT LINKS
- Home
- Beading & Jewelry Making
- Clay Basics
- Fun Paper Crafts
- Home Decor
- Projects with Fabric
- Easy Crafts For Kids
- Arts & Crafts Ideas
- Search
- OTHER SITES
- Sleewee
- Worklooker
- Jobspector
How to Make Faux Ivory Buttons
by Jacqueline Gikow
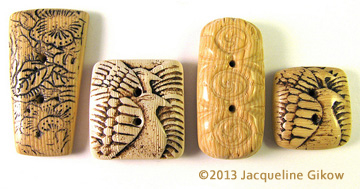
Polymer clay can be mixed to resemble some amazing other materials such as ivory or bone. Study and use traditional markings and patterns on stone, bone, or ivory from different ethnic traditions.
Materials and tools
1 1/2 (42g) ounces translucent polymer clay
1/2 (14g) ounce white polymer clay
Burnt umber acrylic paint
Pasta machine or brayer
Waxed paper or plastic wrap
Cutting blade
Small items for texturing, such as coffee stirring straw, golf tee, or leatherworking tools
Piercing towels
Soft cloth or buffing wheel
Instructions for making faux ivory buttons
1. Mix 1/2 ounce (14g) translucent polymer clay with 1/2 ounce (14g) white. Roll the mixture into a sheet about 1/8 inch (3mm) thick. Roll the remaining 1-ounce (28g) of translucent clay into a sheet of the same thickness.
2. Stack one sheet on top of the other and roll them together through the pasta machine, flattening them to 1/8 inch (3mm) thick. Cut the sheet in half, stack and roll it again. Repeat this twice more.
3. Now cut this layered sheet into quarters, and stack them on top of each other, but roll them only enough to stick the layers to each other; don’t flatten them. Cut this stack in half, and place one half on top of the other. This will result in a layered block about 2 inches (5cm) high and composed of many thin layers.
4. Use the cutting blade to slice of one vertical end of the stack, about 1/8 inch (3mm) thick. Subtle striations will be visible. Lay the slice onto a piece of waxed paper. Cut it into a button shape by bending the cutting blade slightly to make the cuts curved.
5. Place a piece of waxed paper or plastic wrap on top of the shaped polymer clay and with your fingertip, gently coax the edge downward to bevel them.
6. Use the tiny tools to impress a pattern into the polymer clay. Study pictures of ethnic bone beads for pattern inspirations. Sharp-edge tools that make a well-defined shape into the polymer create more realistic designs than something like a rubber stamp, which isn’t as crisp.
7. You can make the buttonholes now or use a pin vise after baking. The latter results in a more realistic effect. Bake the button according to the manufacturer’s directions.
8. When the button is cool, drill the buttonholes with the pin vise if you didn’t make one before baking. It shouldn’t be necessary to sand the button, but if there are any rough edges, sand with 600- or 800-grit wet/dry sandpaper, just enough to smooth the rough spot.
9. Rub burnt umber acrylic paint onto the button, pressing it into all the indentations, then immediately wipe away the excess paint from the surface with a paper towel. Buff the button with a soft cloth or buffing wheel to create a soft sheen, giving your faux ivory buttons a more realistic look.
Related articles
Make a Polymer Clay House Necklace | Polymer Clay Basics | Clay Basics | Precious Metal Clay