by Carly Van Heerden
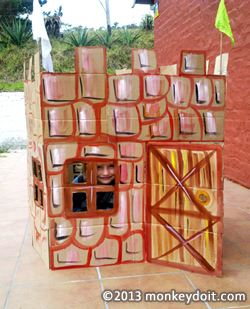
Instructions for building a castle with cardboard boxes are provided below.
All children love having a place they can call their own. Over the weekends, or during the holidays, making forts from mattresses, pillows, sheets and tables is much fun. But cleaning up and having to break the fort down at the end of the day, or weekend, sometimes leaves little one upset. “How could you break down my fort, especially when I took so long to build it?” they may cry.
The obvious solution would be to make a fort that doesn’t need to be dismantled, one that can live indoors or out (weather depending) for always. A fort is one thing, but a true-to-life looking castle is another.
A trip to the store for a few cardboard boxes and other odds and ends will have you set and ready to make your child their very own dream castle, or whichever other form of abode he or she would like.
Expenses involved shouldn’t be more than $4.00, and the time it should take to make such a structure will be roughly two hours, depending on how fast you work and whether or not you choose to stop for a tea-break!
Of course your child could do the painting, which makes it even more enjoyable. But be sure to be there as some children are truly particular about the design and style of the exterior of their castle, and using their little hands can often be tricky for them!
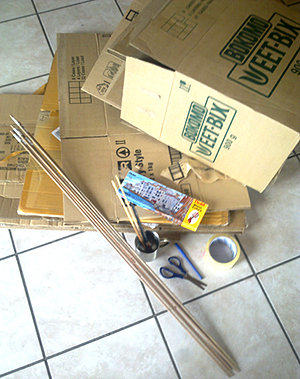
1. 6 to 8 cardboard boxes - size 30 inches (75cm) x 20 inches (50cm) or larger
2. Packaging tape
3. Scissors
4. 6 pencil-thick dowel sticks 40 inches (1 meter) in length
5. Paint (any colors)
6. Paint brushes (all sizes)
7. Material for flags
1. Find a large area to work in.
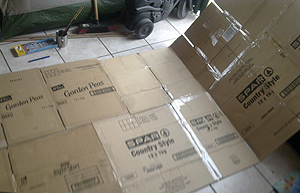
2. Dismantle your boxes. They should now be flat sheets of cardboard.
3. Standing two of the cardboard sheets alongside one another, vertically - use the folds in the boxes to determine your basic square. You might find you need to bend one of the boxes to make a new fold in order to make your perfect square.
4. Place the cardboard sheets flat on the ground again and use your packaging tape to stick the two sheets together. You should now have two flat cardboard sheets next to one another on the ground joined with packaging tape.
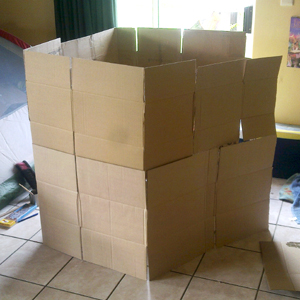
5. To make the castle higher now, tape two more flat sheets of the same size above the first two.
6. Stand your now larger cardboard rectangle as if preparing the walls for the castle. Move to the inside of the castle and tape the two open ends together. You should now have a perfect square with no roof.
7. Standing inside the box, see where the structure may want to fold over or cave in - are there any weak points that may cause the walls to collapse? Use your dowel sticks to keep these areas secure, preventing the now large box from caving in. You may need to fix a few dowel sticks horizontally or vertically, depending on where you see the weak points.
8. With your structure secure now, use your scissors (or a knife - careful with the knife around children) to cut a door and a few squares for windows in the cardboard walls. The door should be able to open and close.
9. If you are making a castle you can cut out the brick formation on the tops of the walls, as seen in the final image.
10. Once you have your basic structure you will be free to paint it however you like.
11. To make your flags, simply cut the material into triangles and join them to the tops of two of the dowel sticks - to make two flags.
12. Join the flags to your castle with packaging tape.
13. At this point you can be creative. Perhaps you may want to make curtains for the windows, which can also be stuck to the insides of the castle with the packaging tape.

As you can see, there’s really nothing to it. The most important point to remember when making your castle is that you will need to ensure that the structure is secured with the dowel sticks at any point where it looks as though it may fold or cave in.
Because cardboard is light-weight your children can move their castle to wherever they want it to be, indoors our outdoors. Keep in mind that obviously cardboard and moisture aren’t the best of friends. So, to avoid disappointment, if you do see any clouds about its best to bring the castle back indoors.
Another advantage of such a structure is that when the holidays are over and it’s time for school, the castle can simply be folded and stored. You will be able to remove the packaging tape from the inside of the castle, where the two open ends joined, and simply fold the castle as though closing a book.
Not only is putting your own cardboard castle together a whole lot of fun, you will be investing your time in a project that renders fun for a long time!
Related Articles
How To Craft Minecraft Style Using Cardboard | Make an Amazing Cardboard Maze | See More Fun Projects for Children
![]() How To Make Diamond-shaped Earrings Out Of Beads
How To Make Diamond-shaped Earrings Out Of Beads
How to make diamond-shaped earrings out of beads using a Brick Stitch.
![]() How to Create a Bracelet with a Sliding Clasp
How to Create a Bracelet with a Sliding Clasp
Tutorial that shows you how to create a square knot sliding clasp for jewelry.
![]() How To Make A Dream Catcher For A Child
How To Make A Dream Catcher For A Child
Step-by-step instructions for how to make a Dream Catcher.
![]() Create a Fun Flower-Pot out of a Plastic Cup
Create a Fun Flower-Pot out of a Plastic Cup
A fun flower-pot project great with or without children.
![]() How To Make A Plastic Bottle Bird House
How To Make A Plastic Bottle Bird House
A simple bird house using a plastic bottle that costs next to nothing to make.