by Jacqueline Gikow
Here is an inexpensive way of making a collection of your favorite artists’ work in miniature. All the images come from the public domain to avoid copyright infringement. These images were found on the Internet, then reduced in size, perfect for desk or tabletop display, as elegant jewelry, or even refrigerator magnets.
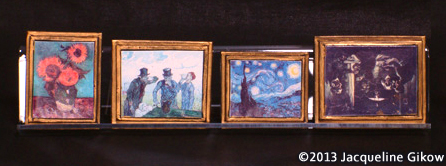
Step 1. Select an artist you are fond of and do a search on the Internet for four images of your favorite paintings. Four images will fit on the 10-inch stand once you have transferred the images to polymer clay. I’ve used images from Van Gogh for this demonstration.
Step 2. Using a digital imaging program, such as Photoshop, reducing the painting image to two inches in width, making sure each image is sharp and in focus. Using a toner-based color copier, reverse the images before copying them onto Laseretran silk. An inkjet image will not work. The images must be reversed before copying onto the Lasertran silk so that when they are pressed onto the polymer clay, they will reproduce the proper way.
Step 3. Using a pasta machine, condition, and then roll out the white Premo at #1 or the thickest setting. Press each image firmly onto the clay. The easiest way to ensure that the image is evenly pressed onto the clay is to press using a bone folder.
Step 4. Leave the images that were copied onto Lasertran on the clay for a half hour and then submerge the clay into water. Let the impression steep for a couple of minutes then mix it in the water until the support paper glides off.
Step 5. Remove the clay transfers from the water and allow to dry. When dry, closely trim each image to the picture edge on all four sides and bake at 275° for 20 minutes.
Step 6. Repeat for each image.
Step 1. Using the pasta machine, condition, and then roll out the black Premo at #1 or the thickest setting.
Step 2. Place one clay image on a sheet of black clay. Using a craft or X-Acto knife, cut closely around the image and remove the inside black rectangle of clay. Place the baked image in the resulting hole. Cut a 1/8-inch border around the image to create a narrow frame.
Step 3. Place the image and frame on another layer of black clay. Trim the clay backing layer also with a 1/8-inch borer around the inner frame and smooth the edges of the two black layers with your finger.
Step 4. Repeat for each image.
Step 5. Bake the framed images for 25 minutes at 275°.
Step 6. (Optional) After baking, spread gold Rub 'n Buff on the black frame with finger or cotton swab. Use sparingly. Buff gently when dry.
![]() How To Make Diamond-shaped Earrings Out Of Beads
How To Make Diamond-shaped Earrings Out Of Beads
How to make diamond-shaped earrings out of beads using a Brick Stitch.
![]() How to Create a Bracelet with a Sliding Clasp
How to Create a Bracelet with a Sliding Clasp
Tutorial that shows you how to create a square knot sliding clasp for jewelry.
![]() How To Make A Dream Catcher For A Child
How To Make A Dream Catcher For A Child
Step-by-step instructions for how to make a Dream Catcher.
![]() Create a Fun Flower-Pot out of a Plastic Cup
Create a Fun Flower-Pot out of a Plastic Cup
A fun flower-pot project great with or without children.
![]() How To Make A Plastic Bottle Bird House
How To Make A Plastic Bottle Bird House
A simple bird house using a plastic bottle that costs next to nothing to make.