by Jacqueline Gikow
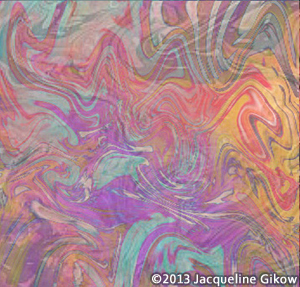
Don't be fooled by the seeming complexity and sophisticated exquisiteness of marbleized patterns on paper. The undulation of colors may appear delicately painted by hand or stamped using a machine, but they're really fashioned by fluid paints.
Originating in the 1200s, marbleizing was first done in Asian countries such as Japan and perhaps China. Marbleizing entails using porous papers to absorb paint. These days you can marbleize paper to create your own opulent designs for use as crafts and greeting cards.
Uncoated mid-weight paper
Alum (helps paint stay on paper)
Paintbrushes
Rope and clothes pins
Iron
Acrylic paints
Methyl cellulose
Whisk
Two large baking pans or trays for photographic developing
Skewer or knitting needle
Rake (rakes are available at an arts and crafts store, or you can create one yourself)
Materials for marbleizing paper are economical and easily found at art and craft shops. To fabricate a rake for creating patterns in the paint, insert toothpicks between two pieces of cardboard. It should look sort of like a comb with the toothpicksin varying distances apart.
Mix 1/8 cup of alum with two cups of water. On one surface of your paper, draw a pencil mark. Then coat that surface of your paper with the mixture of alum and water. The pencil lines will be a sign of which face of the paper was prepared. Hang the paper on a cord to dry for about an hour. When the paper is dry, flatten it using a medium temperature of an iron.
Combine a half cup of methyl cellulose and four quarts of cool water in a bowl. Whip the solution to integrate the the methyl cellulose. When the solution is lump-free, let it stand for around at hour, mixing at periods of 15 minutes until it thickens some. Transfer the mixture into a clean, shallow, baking pan.
Mix the colored paints until they are very thin, using small quantities of water. Wet a paint brush with your first color, and keep it about two inches above the pan. Rap on the brush using a pencil and create paint speckles in the liquid in the pan.
Add no more than five paint colors to the pan’s liquid surface, or leave the paint speckled on the solution to generate a stonelike pattern.
Another technique to make an interesting swirled pattern is to stir the paint with a skewer or a knitting needle.
A third marbleizing pattern is an arched design. Drag the rake from side to side of the pan, then drag your rake lengthwise of the pan to form arches.
Pick up the alum-treated paper by two diagonal corners and release it to gently float it on the patterned paints. Make sure the alum-treated side of the paper is facing dow. Release the paper’s corners and flatten out whichever air bubbles you can by putting light pressure on the paper with your fingers. Float your paper for a couple of moments, then carefully pick it up from the patterned mixture.
As soon as you remove the paper from the patterned mixture, transfer it to a clean pan, treated side up and flood it with warm water. Suspend the paper, using the clothespins; marbleized side facing out. Don’t handle the paper for at least two hours. It will take about that long to dry.
Make your mind up if you’re going to store or throw away the solution because you can make a number of copies of the design before it deteriorates. If you want to modify colors, lay newsprint strips over the liquid’s surface, then remove. Repeat the process with clean newsprint until the mixture is clear. The solution can be kept for around a week in a covered jar. There is a possibility of rust, so don’t store it in the pan. Don’t pour the solution down the drain as it could get clogged. Instead throw it in the trash after transfering the mixture into a plastic sealable bag or a nonbreakable container. You don’t have to worry about hazardous pollutants.
Looking for more paper crafting ideas?
![]() How To Make Diamond-shaped Earrings Out Of Beads
How To Make Diamond-shaped Earrings Out Of Beads
How to make diamond-shaped earrings out of beads using a Brick Stitch.
![]() How to Create a Bracelet with a Sliding Clasp
How to Create a Bracelet with a Sliding Clasp
Tutorial that shows you how to create a square knot sliding clasp for jewelry.
![]() How To Make A Dream Catcher For A Child
How To Make A Dream Catcher For A Child
Step-by-step instructions for how to make a Dream Catcher.
![]() Create a Fun Flower-Pot out of a Plastic Cup
Create a Fun Flower-Pot out of a Plastic Cup
A fun flower-pot project great with or without children.
![]() How To Make A Plastic Bottle Bird House
How To Make A Plastic Bottle Bird House
A simple bird house using a plastic bottle that costs next to nothing to make.