by Carly Van Heerden
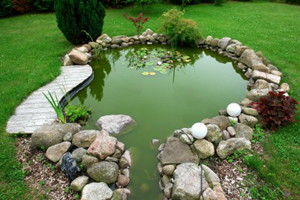
Instructions for making a garden pond are provided below. Dont have rocks? Learn how to make your own rocky features around your pond.
Whether you have a large garden or a small one, a water feature is a great addition to just about any home. Water is the element of tranquility, and having your own pond with a few rocks, plants and perhaps a few fish, is a great way to feel as though you’re in nature, without having to leave the comfort of your own home.
This article will explain, step by step, how you can make your own pond in your garden and then increase the realism of your tranquil area with a few home-made rocks. Before we go another step farther, please note that in order for water to stay clear and free of algae in any pond, the water needs to be circulated via a pump to create oxygen within the water.
Therefore any home-made pond, regardless of its size, will need a water pump. Obviously you’ll want to avoid using a pump that requires an electric source in order for it to function, as this usually means that cables leading to sockets will be left exposed which can be dangerous, and look horrid too.
Through a short search on the web you will find solar-panel powered water pumps (and fountains) from as little as 12$ to as much as 450$ depending on the volume of water you wish to keep oxygenated. Obviously if you intend to have fish in your pond, they will need sufficient oxygen. You could choose to go with one large solar-panel powered pump, or two smaller ones at either ends of your pond.
This really is an easy process. The only costs involved will be for the amount of liner/thick black plastic you wish to use, the pump, and your time and sweat!
1. Thick black liner/plastic - size will depend entirely on how big you want your pond to be
2. A pickaxe and a spade
3. Rocks of all shapes and sizes or other heavy objects to start off with
1. Decide where in your garden you would like your pond to be. Consider the positioning of the sun - do you want to be able to relax in the sunshine in the afternoon or in the morning. If you are going to have fish in your pond, remember that they would prefer partial shade at some time during the day.
2. Dig, Dig, Dig - Yes! Use your pickaxe to loosen the ground and then dig up the soil to create your pond. Remember, you’re not necessarily making a swimming pool, so it won’t need to be too deep, knee/thigh height should be fine. Remove any sharp, protruding stones or objects that may damage or tear the black plastic.
3. Place the black plastic lining into your dug-out hole/pond keeping in mind that at least 500 cm/200 inches of the plastic should be left exposed along the outside edges of your pond. This will be so that when you fill your pond with water, and actually place pressure on the black plastic liner, you will have plastic to ‘play’ with - if you leave enough plastic outside (along the edges) of the pond, the weight of the water will not cause the black plastic to pull inward, which would ultimately lead to your pond collapsing inward.
4. Place a few heavy objects on the edges of the exposed black plastic, just to keep it in place and secure as you fill your pond to maximum capacity, with water.
5. Once the pond is filled with water, it will be done! Now to decorate it and create effective natural-looking surroundings.
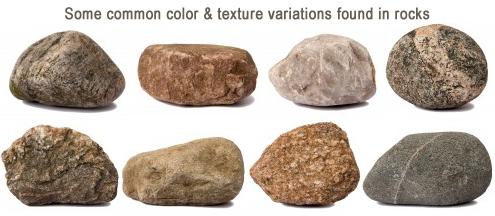
Not everyone has access to rocks, and rocks do tend to be cumbersome and difficult to transport. As you dig up your garden to make your pond you may find a few, but ideally you might want your pond to be surrounded entirely by rocks, so ‘a few’ won’t be enough. For your water feature/pond you can make your own rocky features from mesh and cement/mortar.
1. A large bucket
2. Water
3. Cement/mortar
4. Fine sand
5. Fine wire mesh
6. Polystyrene or other material for the center of your rock, around which the mesh will be placed
7. Non-toxic brown, black, or earthy colored paint
8. Gritty sand paper
9. A trowel
1. Take a look at your pond and picture the rock formations you would like to see. Once you have a plan, you can begin.
2. Find a suitable area to work in. Remember: firstly, you will need to leave the rock/rocks to cure for three days and you don’t want them to be exposed to direct sunlight all that time, as this may result in cracks on the surfaces of your cement rocks. So, work in an area that has shade some time of the day, and sunshine for the rest. Secondly, you will not want to move your structure around while it is still wet, so rather construct it in an area where it can remain without having to be moved around.
3. Prepare your cement/mortar by mixing 1 part of cement/mortar powder with 3 parts of fine sand, in your large bucket. Mix the two dry ingredients together well. Then add your water to make a thick paste. The longer you spend mixing your paste, the stronger the mix becomes. You don’t want your rocks to crack within the first few weeks. So, rather put at least ten minutes into stirring your mortar mix, then leave it for 5 minutes, and then stir it again for another ten minutes.
4. Depending on the shapes that you want your rocks to be, cut your polystyrene, foam or any other waterproof material you may want to use, to shape. You may want to stick a few pieces on top of one another to make one very large rock. Join the ‘inner-material’ together, and then cover it with your fine wire mesh, allowing the mesh to cling as closely to the ‘inner-material’ as possible. Remember to allow the mesh to fold underneath your polystyrene, too. You are making a moveable structure, so the underneath must serve as a relatively strong base.
5. Using a trowel, begin to paste your cement/mortar mix onto the wire mesh, smearing at least two or three layers over the mesh so that none of it is exposed. You do want it to be relatively thick; if it’s too thin it may crack easily.
6. Once you have covered your whole ‘rock’ in mortar, you will want to texture the surface. This you can do with a sponge (abrasive pad) by simply dabbing the sponge over the surface area of your wet cement/mortar rock.
7. Leave your rock to stand for three days, spraying it with water every few hours. This will help it to set and become stronger.
8. After 3 days, your rock should be set and ready. If you need to cover the underneath of your rock with mortar to make it look more realistic, you can repeat the above process.
9. Once your rock/rocks are complete and set, you can paint them. Obviously it’s best to use non-toxic paint, especially if they are to be submerged in a pond that is home to a number of fish. Paint your rocks and then once the paint is dry, use your gritty sand paper to create a more natural-looking effect on the surface of your rock/rocks.
10. Once they are done, position them around your pond as you see fit. Add a few ferns and other water-side plants around your pond to create a completely natural-looking setting.
11. Place the pump in the pond as soon as the pond is filled with water. You need to keep the water oxygenated from day one. Finally, you can also change the water in the pond every few weeks which helps to get rid of algae and other nuisances like mosquito larvae. Your fish will also be happy with fresh water every few weeks (you won’t need to remove all the water, just three-quarters of it, so you won’t need to disturb your fish when doing your water changes).
And there you have it - your very own water feature/pond in your garden and it didn’t cost you more that 50$, depending on the size of the pond you have created. This project takes time, in some cases up to a week if you will be creating your own rock features, but the result is rewarding and certainly worth waiting for. It’s a fun project which could involve everyone in the family, and it’s a great way to increase the aesthetic (and functional) value of your home.
Related Articles
![]() How To Make Diamond-shaped Earrings Out Of Beads
How To Make Diamond-shaped Earrings Out Of Beads
How to make diamond-shaped earrings out of beads using a Brick Stitch.
![]() How to Create a Bracelet with a Sliding Clasp
How to Create a Bracelet with a Sliding Clasp
Tutorial that shows you how to create a square knot sliding clasp for jewelry.
![]() How To Make A Dream Catcher For A Child
How To Make A Dream Catcher For A Child
Step-by-step instructions for how to make a Dream Catcher.
![]() Create a Fun Flower-Pot out of a Plastic Cup
Create a Fun Flower-Pot out of a Plastic Cup
A fun flower-pot project great with or without children.
![]() How To Make A Plastic Bottle Bird House
How To Make A Plastic Bottle Bird House
A simple bird house using a plastic bottle that costs next to nothing to make.