by Carly Van Heerden
Living in the city or a built-up area can often lead folks to long for the countryside. There’s nothing quite as wonderful as the smell of fresh grass in the morning, and the sounds of nature on a farm. Some don’t get to spend every day in such an environment, but with a little imagination there’s nothing stopping anyone from bringing the countryside into their living room.
This is a lovely project for children because it involves a great deal of creative thinking. It’s crafting at its best, and involves a bit of gardening, too, allowing children to spend some fun in the sun and work with their hands at the same time.
Making your own mini-indoor garden or farm shouldn’t cost you more than 4$. The time it should take to create your garden/farm will be roughly three to four hours, due to the setting time required for the Pratley’s Putty structures and for the paint to dry.
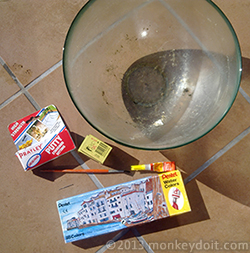
1. 1 x large bowl
2. Craft paints
4. A pin
5. Superglue
6. Burnt matches or thin balsa wood strips
7. Pratley’s Putty
8. Chunk of grass to fit in your bowl
9. Small off-cuts from small-leafy trees
10. Stones
11. Gravel
12. Thin card
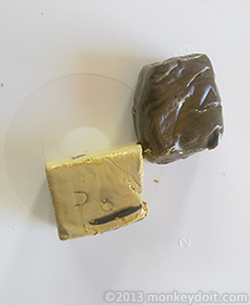
1. Pratley’s Putty works by combining two sticky putty-type substances together. Read the instructions on the box, and blend the dark and light putty together to form pliable putty.
 |
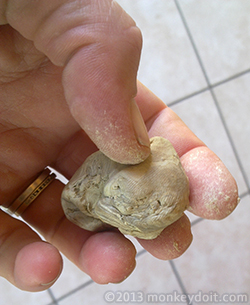 |
2. At first the blended ball of putty will be very sticky. You can set it aside for two to five minutes, until the stickiness dries up a bit.
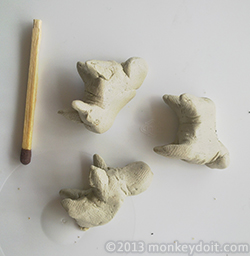
3. Break the ball of putty up into sections big enough to make three cows, four walls and a garage/carport. Obviously you can make as many animals as you like, and build your house to your desired specifications, but for the purpose of this article we have made three cows and a farmhouse with a garage/carport.
4. Like before, leave the putty to set for a few minutes as after working with it, it becomes softer; you will find it easier to work with once it begins to firm slightly.
5. Make your basic cow shapes (no need for them need to be too detailed), and then two small walls/squares for the sides of the house, as well as two long/rectangular walls for the front and back of the house. Then make a longer rectangular-shaped wall which you will eventually fold in three places to make the garage/carport. You can cut tiny squares out of the walls to make windows, and you can even cut an ‘open door’. Obviously you will need to work on a flat surface; a tray or piece of board - even an ice-cream tub lid will work well.
 |
 |
6. Wrap your long rectangular piece of putty (for your garage/carport) around a rectangular block of Lego (or other rectangular block), and keep it in the upright position. Because the putty is still soft the Lego will serve as a mold, allowing the putty to take on the carport shape, and then become firm in this shape.

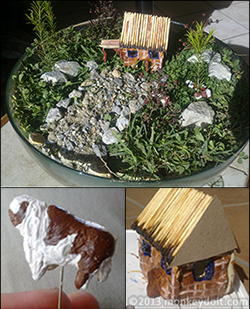
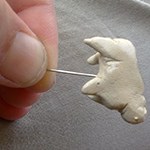
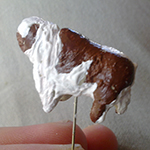
7. Once the cows are almost set, stick a pin into the underneath of each cow, working with them one at a time. Hold the cow by the pin and then paint it to look like a cow. The pin makes it easier to paint the small piece without getting paint over your fingertips.
 |
 |
 |
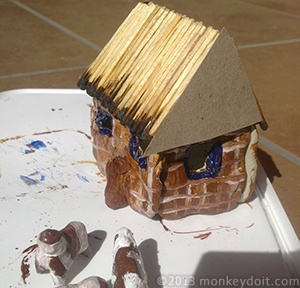
8. Once the walls and garage/carport have begun to set, paint them according to how you would like your farmhouse to look. For this article we chose the face-brick look with blue window frames.

9. Once the paint is dry, use your superglue to stick the walls of your house together. You should be left with a square-shaped little house with no roof. You may find you’ll need to paint the areas where the walls join, as a finishing touch. For the garage; it will be freestanding.
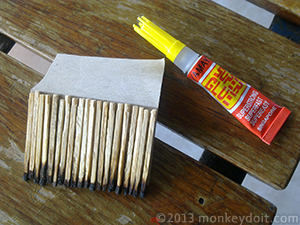
10. For the roof of the house, cut a square/rectangular piece of card that you should be able to fold to make an A-frame roof. Measure the card so that the roof fits perfectly onto your house. Then place a few lines of superglue onto the card and carefully place your matchsticks or balsa wood strips onto the card in a row, as seen in the image below. It’s always better to use burnt matches than live matches, for various reasons.
11. Once the roof is complete, place superglue onto the top of the front and back walls of the farmhouse and gently rest the roof onto the glue. It should stick and dry in seconds.
12. Make a smaller flat roof for the garage/carport, using the same steps you followed to make the roof for the main house.
13. To fill the sides of the roof of the house now, simply cut small triangles of card and then use your superglue to stick them to the upper A-shaped sides of the house/roof, and then paint the card the same color as you painted the house.
14. Your farmhouse and cows should now be complete and ready.
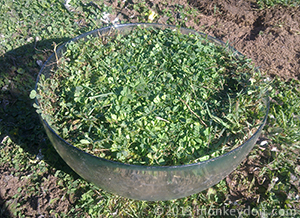
15. Find a really grassy patch in your garden (an area where the grass would not necessarily be missed) and cut out a patch the size of your bowl.

16. Place the round grass patch into your bowl.
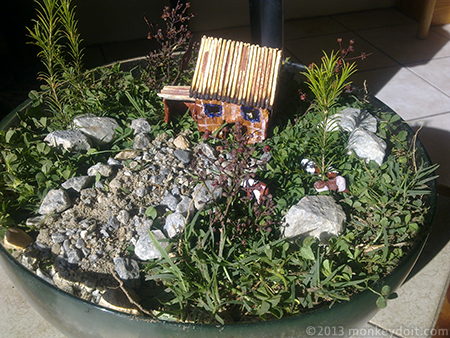
17. Now the fun really begins! You can find small leafy branches from trees in your garden to make small trees to add to your farm. Then use your stones as large rocks, scattered here and there. For effect you can create a gravel driveway to the entrance of the farmhouse. Place all your extras where you see fit around your house, and then add your cows.
18. Your mini-indoor garden farmhouse theme is now complete.
Now you will have the perfect little place to go to in your imagination. You will also have to take care of your little garden/farm, by keeping the grass watered and trimmed. When the leafy-branch trees die off, you can either replace them or keep them as they are, giving your garden the opportunity to experience fall/autumn.
As mentioned previously, this is a lovely project for children and for adults, too. You can obviously create whichever sort of structures you like and could even decide to create a desert scene, in which case you wouldn’t use grass at all; only gravel and sand.
Have fun, and look after your little creation. Here’s hoping you find some time to spend in the countryside soon!
Related Articles
![]() How To Make Diamond-shaped Earrings Out Of Beads
How To Make Diamond-shaped Earrings Out Of Beads
How to make diamond-shaped earrings out of beads using a Brick Stitch.
![]() How to Create a Bracelet with a Sliding Clasp
How to Create a Bracelet with a Sliding Clasp
Tutorial that shows you how to create a square knot sliding clasp for jewelry.
![]() How To Make A Dream Catcher For A Child
How To Make A Dream Catcher For A Child
Step-by-step instructions for how to make a Dream Catcher.
![]() Create a Fun Flower-Pot out of a Plastic Cup
Create a Fun Flower-Pot out of a Plastic Cup
A fun flower-pot project great with or without children.
![]() How To Make A Plastic Bottle Bird House
How To Make A Plastic Bottle Bird House
A simple bird house using a plastic bottle that costs next to nothing to make.