by Carly Van Heerden
Christmas and Easter are two very special holidays in the year. Besides their spiritual significance, Christmas and Easter are times in the year when family members and friends can come together in the name of sharing, abundance and joy.
Many of us like to send greeting cards to our friends and family members across the miles, as tokens of our love and good wishes during these times. But purchased cards can be costly and if not recycled or stored for sentimental reasons, are simply thrown away after a few weeks.
Giving someone an original greeting card that you have made by hand can be more special than simply purchasing one from a store. But, of course, this can only be done if you have the time.
Children like to tackle crafty projects like this, so for the purpose of this article we will be making a Christmas greeting card and an Easter greeting card that they will be able to create themselves.
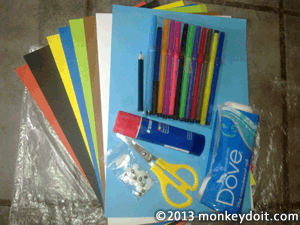
1. Colored sheets of A4 sized paper - especially red, black and brown for Father Christmas, and blue, green, yellow and brown for the Easter bunny
2. Cotton wool
3. Colored pens
4. Scissors
5. School glue
6. A pencil
7. Googly eyes
We will be making both cards at once in this article, so step by step instructions will be given per card.
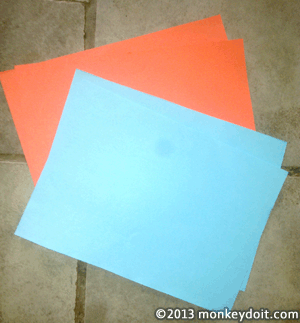
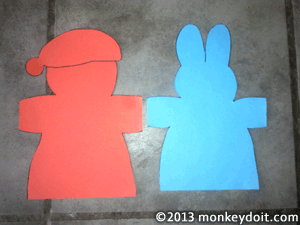
1. For Father Christmas, cut your red A4 sheet of paper in half. For your Easter Bunny, cut your blue A4 sheet of paper in half (obviously your bunny can be whichever color you like).
2. With your pencil (use the pencil until you are certain of your lines), draw the basic shape of Father Christmas on one of your now A5 sheets of red paper, and a basic shape of a bunny on one of your blue A5 sheets.
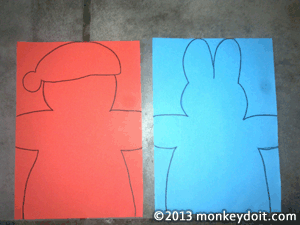
3. Cut out the shapes you have drawn.
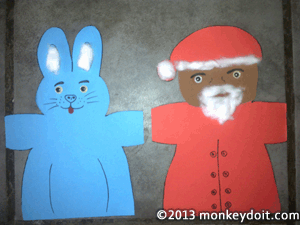
4. Make your faces. For Father Christmas you can use a brown sheet of paper; cut it to the same shape as his round face and then glue it down. Using your school glue, place a small cotton ball on the end of his hat, and some cotton wool around the rim of his hat. With your colored pens, draw the eyebrows then use your school glue to stick the Googly eyes down. Draw a nose and then a mouth, and then use your school glue again to stick a beard of cotton wool to his face. Also draw a few buttons down the front of his tummy.
For the bunny - using your school glue, stick cotton wool onto his long ears to look like the white inside of a bunny’s ears. Use your colored pens to draw a nose, mouth and whiskers. Use your school glue to stick the Googly eyes to the bunny’s face.
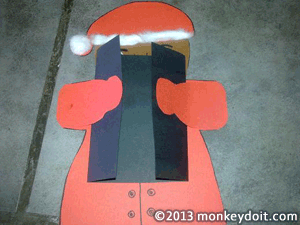
5. Using your remaining blue and red paper, cut a strip from each. The strips should be the length of the arms of each character, from ‘elbow’ end to ‘elbow’ end, as seen in the image below. They should also be as wide as the arms of the characters.
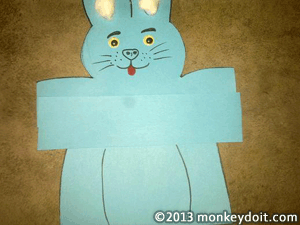
6. Cut the strips in half then glue an end of each half to the very ends, or the ‘elbows’, of your characters. At the same time, cut the other ends (centered ends) into rounded hands. Father Christmas and the Easter Bunny should now have arms that open and close as though they want to give you hug!
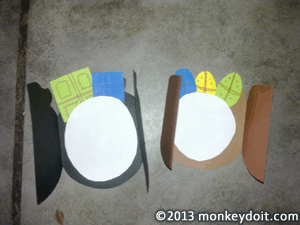
7. For father Christmas you will now make a gift bag, and for the Easter Bunny an egg basket. Cut a rectangle from your black sheet of paper for the bag. Then fold either ends of the rectangle so that they meet together in the center - like the doors of a cupboard, or windows.
For the bunny use a brown sheet of paper to make the basket the same way.
8. Cut the rectangular cupboard/window-like sheets of paper into; a rounded bag for Father Christmas and a rounded basket for the Easter bunny.
9. Using your other colored paper, cut out a few small oval Easter eggs and square packages - the eggs for the basket and square packages for Father Christmas’s bag. Glue them respectively on top of the insides of the basket and bag, so that when you close the cupboard/windows, just the tops of the eggs and packages stick out the top of the basket and bag.
Then, cut two circles of white paper and use your school glue to stick them in the centers of the basket and bag. See the image below for the above two steps.
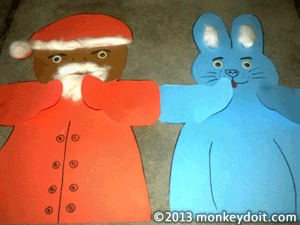
10. Slide the bag into Father Christmas’s arms, and then use your school glue to stick the doors of the cupboard/window to the ends of his hands. Repeat the same process to stick the basket to your bunny.
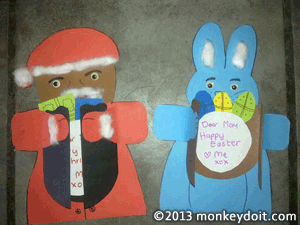
11. You should be left with what looks like Father Christmas holding a bag of gifts, and the Easter Bunny holding a basket of eggs, as seen in the image below.
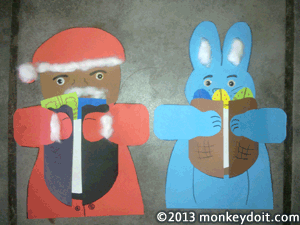
12. Write your message on the white circles of paper on the insides of the basket and bag.
13. Finally, present the card - and when the arms open the message will raise-up/pop-up in front of the reader.
This project is great for children and it’s unlikely that they will have ever tackled such a project! These original cards take some time to make, but the results are well-worth the effort. Obviously they can be made for any occasion including Thanksgiving, birthdays or St. Patrick’s Day - whichever occasion requires a card!
Open your imagination and have fun!
Related Pages
![]() How To Make Diamond-shaped Earrings Out Of Beads
How To Make Diamond-shaped Earrings Out Of Beads
How to make diamond-shaped earrings out of beads using a Brick Stitch.
![]() How to Create a Bracelet with a Sliding Clasp
How to Create a Bracelet with a Sliding Clasp
Tutorial that shows you how to create a square knot sliding clasp for jewelry.
![]() How To Make A Dream Catcher For A Child
How To Make A Dream Catcher For A Child
Step-by-step instructions for how to make a Dream Catcher.
![]() Create a Fun Flower-Pot out of a Plastic Cup
Create a Fun Flower-Pot out of a Plastic Cup
A fun flower-pot project great with or without children.
![]() How To Make A Plastic Bottle Bird House
How To Make A Plastic Bottle Bird House
A simple bird house using a plastic bottle that costs next to nothing to make.