- MONKEYDOIT LINKS
- Home
- Beading & Jewelry Making
- Clay Basics
- Fun Paper Crafts
- Home Decor
- Projects with Fabric
- Easy Crafts For Kids
- Arts & Crafts Ideas
- Search
- OTHER SITES
- Sleewee
- Worklooker
- Jobspector
How To Make A Safety Pin Necklace
by Carly Van Heerden
Most children derive great pleasure from threading a needle through a bead, or even the eyes of a button. This is a great pastime for children who have been taught how to work with a needle and thread. Obviously their first encounter with the pointed end is one they’ll remember, and inevitably they learn to work carefully. Working carefully with a needle requires a great deal of concentration and attention. Any pastime that improves concentration in a child is one worth pursuing.
Likewise, learning to create patterns ultimately serves to increase any child’s cognitive skills.
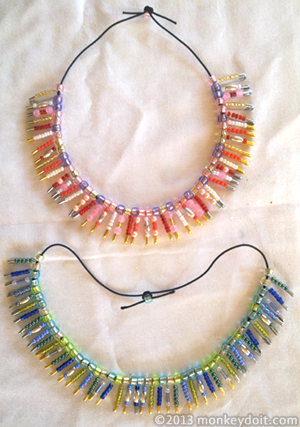
This project is perfect for children in that it involves threading beads onto safety pins and then arranging the beaded safety pins in a pattern to create a beautiful piece of jewelry. Obviously this project is not only for children. You could make a truly exquisite piece yourself, that could turn heads at any major function.
Regardless of where you choose to wear your necklace, it’s bound to become a conversion piece due to its sheer originality.
A single necklace shouldn’t cost you more than 1$ or 2$. Once again, this depends on the types of beads you choose to use. If you can find precious stone beads this tiny, they could add serious value to your necklace.
The time it will take you to make such a necklace will depend on how well you concentrate and how much attention you’re willing pay to detail. One mistake in the middle of the necklace could lead to your having to take it apart to start all over again!
So, let’s take a look at how to make your very own safety pin necklace.
Materials Needed To Make A Safety Pin Necklace:
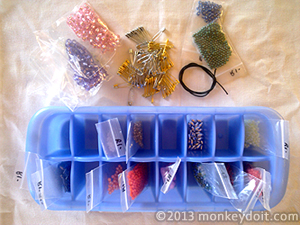
1. 0.5 meters/20 inches thin elasticated string, black or any color of your choice
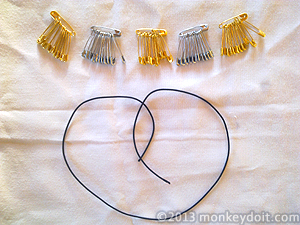
2. 50 to 100 small gold or silver (or both) safety pins, depending on how long you want your necklace to be
3. Assortment of tiny beads
4. Assortment of large-hole beads
5. A semi-deep dish to keep your beads in, preventing them from rolling away
How To Make A Safety Pin Necklace Step By Step:
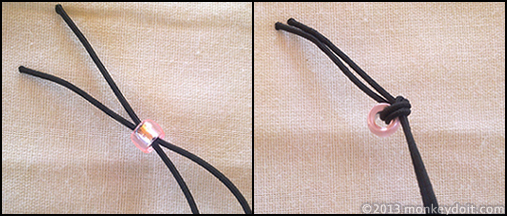
1. Decide on your pattern at first. For this piece we have chosen to separate each beaded safety pin with a large-hole bead, i.e. safety pin > large-hole bead > safety pin > large-hole bead > safety pin, and so on.
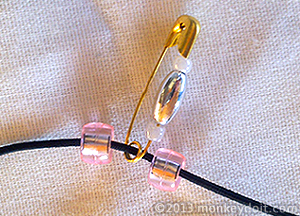
2. Place your first safety pin onto your elasticated string.
3. With the safety pin open now on the string, thread a few tiny beads onto the open end, leaving enough space for the safety pin to easily close again. In the image below you will see the pattern formed with the tiny beads on the first safety pin.
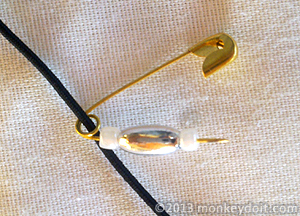
4. If you’re to be making a necklace similar to the one in this article, your next step will be to thread a large-hole bead either side of your first beaded safety pin.
5. You can obviously choose whether to use only silver safety pins, only gold safety pins, or a combination of both as seen in this article.
6. Now that you have your center, you can start to create your pattern according to how you want your necklace to look. The most important thing to remember here will be that you should ensure that the beaded sides of your beaded safety pins are always facing you. Without thinking you may thread the safety pin backwards onto your elasticated string, only to discover that the non-beaded side is facing you. Should you only realize this once your necklace is complete, you’ll obviously have to unthread each bead to get to the one that faces the wrong way.
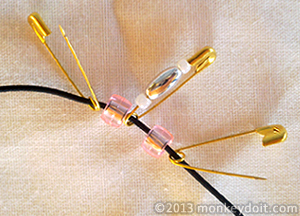
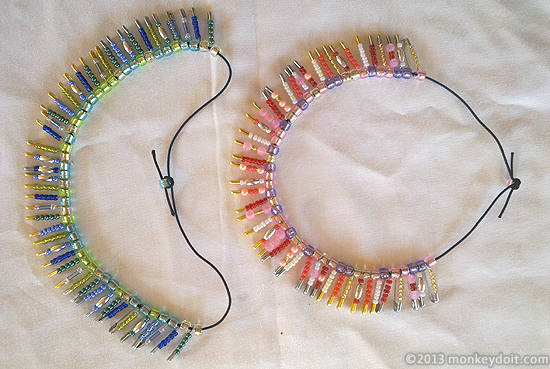
Below are a few images of the pattern-creating process.
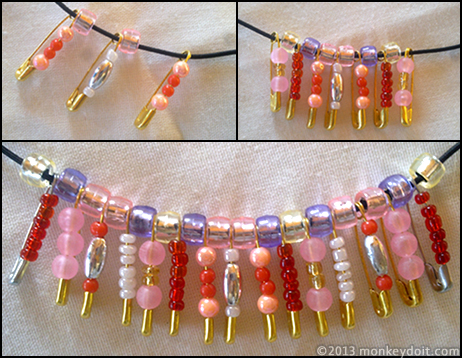
7. As you can see in the images above, this design was created by making matching beaded safety pins, to be placed either side of the center piece and the large-hole beads and pins surrounding it. Ultimately you will be creating two beaded safety pins each time, with the same patterns.
8. You can make the necklace as long or as short as you like. Remember that you will be working with elasticated string, which won’t need a clasp or fastener. You’ll be able to simply stretch the necklace over your head once it’s done. Also keep in mind that a piece like this looks great as a choker or short necklace, as the shape of the neck and shoulders allows the beaded safety pins to fall evenly. If the elasticated string is too long, the safety pins will bunch-up and ultimately not look as spectacular.
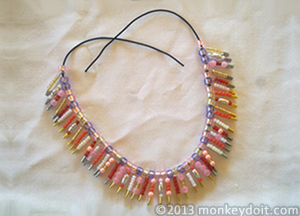
9. When you are happy with the length of your creation, hold your necklace around your neck and measure it to fit snug, close to the base of your neck as discussed above.
10. Pinch the elastic where you want the two ends to join, with your fingertips, and then holding the measured ends together; thread both ends through a large-hole bead. Then pull both ends down and make a simple loop knot around the bead, pulling it tightly.
11. You will still be left with two short ends. Thread each end back through the large-hole bead. Threaded together this should secure the ends, keeping your elasticated-string-safety-pin necklace secure.

As you can see, this is a very easy project!
All you’ll really need is concentration. You can be as creative as you want to be, and you could obviously choose to make these to give to your friends as unique and special gifts. It’s unlikely you’ll find any such necklace at a store, so be ready to tell folks who stop to admire it just how clever you are to have made it by hand.
Enjoy, and watch out for the pointy ends!
Related articles
How Clay Modeling Can Stimulate Your Child's Mind | Make Pasta Necklaces