- MONKEYDOIT LINKS
- Home
- Beading & Jewelry Making
- Clay Basics
- Fun Paper Crafts
- Home Decor
- Projects with Fabric
- Easy Crafts For Kids
- Arts & Crafts Ideas
- Search
- OTHER SITES
- Sleewee
- Worklooker
- Jobspector
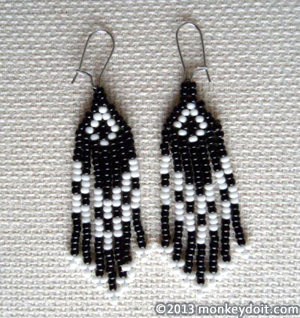
How To Make Beaded Earrings With Fringe
by Joanna Ochocinska
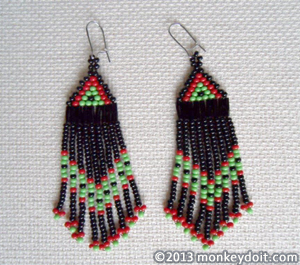
Who doesn’t like earrings?! Women love wearing them, men just love buying them for women and kids love pulling on them incessantly (most likely because they’re jealous). Personally, I never leave home without earrings; I feel naked without them - like a hot dog without a bun. If you’re anything like me, you probably have more pairs of earrings than you can count and you don’t ever wear half of them. This probably doesn’t stop you from buying more or wanting more. That’s OK, we’re going to learn how to make yet another pair and you will definitely wear this one. Once you learn how to make them, you will find that it’s a very cost reducing skill to have, especially around birthdays and Christmas time.
The technique used to make these earrings is not terribly complicated but it requires a lot of patience and precision. The best thing about it is that it only takes about an hour to make one earring so if it’s late at night, all the shops are closed and you’ve just remembered it’s Mother’s Day tomorrow, this is your solution!
I suggest using small seed and bugle beads on this project. However, if you’re really attached to your eyesight or if you want to create a pendant, you could use more chunky beads. The colour of the thread you’re using should be as close to the colour of the beads as possible or transparent so that it doesn’t show in between the beads.
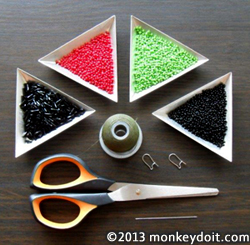
Materials Needed To Make Beaded Earrings With Fringe
- Seed beads of different colours
- Bugle beads
- Scissors
- Thread
- A needle
- Earring hooks
How To Make Beaded Earrings With Fringe Step By Step
1. Cut a 1,5 metre piece of thread and secure it with a knot (the knot is optional - it’s easier to work with but it might be visible in between the beads if it’s too big).
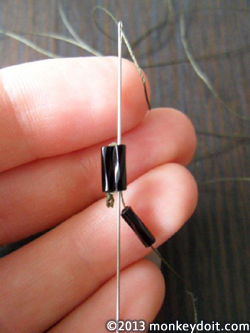
2. String two bugle beads onto the thread and push them all the way to the knot or to a few centimetres from the end of the thread (you will tie it off after you add the fringe).
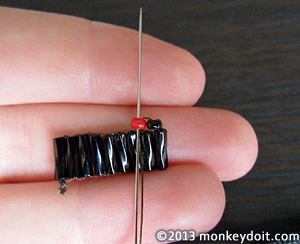
3. Bring the needle back up through the first bugle bead.
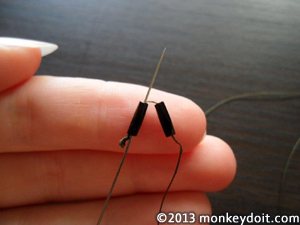
4. Push the needle back down through the second bugle bead.
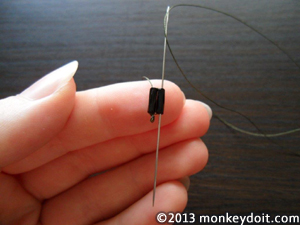
5. Slip another bugle bead onto the thread and push the needle down through the preceding bead and then back up through the new one.
 |
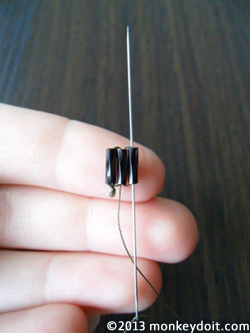 |
6. Keep adding bugle beads this way until you reach the required width of your earring.
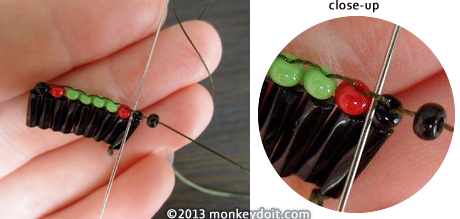
7. Slip one seed bead onto the thread and slide the needle underneath the thread bridge connecting the first two bugle beads. If you don’t want the thread to show in between the beads, string two seed beads on and skip the first thread bridge. The first option is more precise and holds all the beads in place a little better.
8. Bring the needle up through the seed bead (second one if you chose to string two of them).
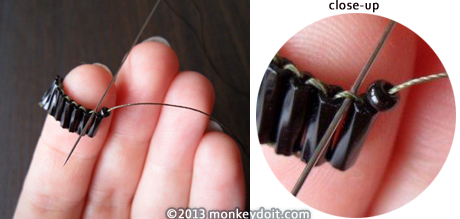
9. Keep adding beads one by one repeating steps 7 and 8 until you reach the end of the row.
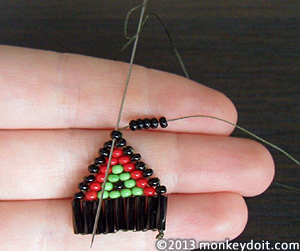
10. Keep adding rows on top the same way. Remember that in each new row there will be one less bead.
11. Once you only have one or two beads at the top make a loop with 4 or 5 beads.
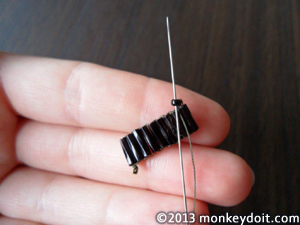
12. Push the needle all the way down through the side of the earring.
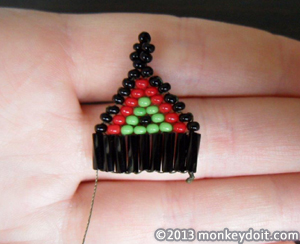
13. Add the fringe by stringing a number of seed or bugle beads of your choice onto the thread.
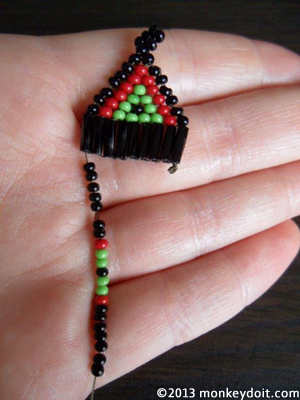
14. Add one or three seed beads and bring the needle back up through the entire tassel and the first bugle bead of your foundation row.

15. Go back down through the next bugle bead and repeat steps 13 and 14. You can vary the length of the tassels by increasing or decreasing the number of beads but the minimum is 20 seed beads if you want to keep the fringe dangly.
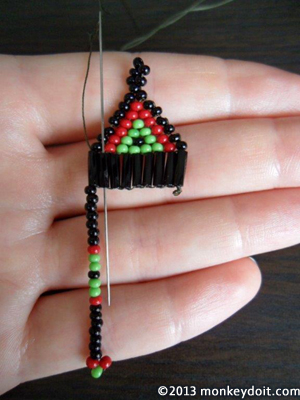
16. Tie off the ends of the thread.
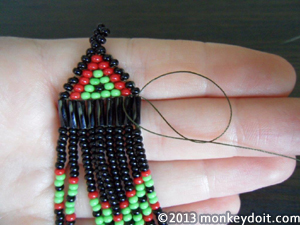
17. Add the earring hook by sliding it through the loop at the top of the earring.
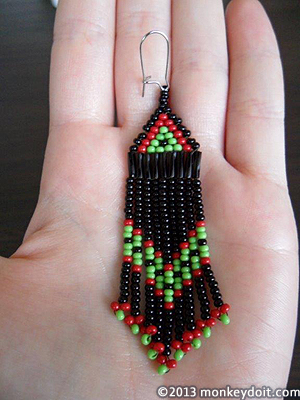
I know, they look awesome. No, you may not keep them. They were supposed to be a present, remember? Yes, you may try them on. Ohhhh.... OK, I guess your mum will have to wait a bit longer for her present. You can always make another pair on your commute tomorrow!
Next time you can experiment with different designs and colours as well as the width of your earring. You might want to replace the bugle beads in the foundation row with up to three seed beads. This way you can incorporate the foundation row into your design as shown in the photo.
Happy beading!
Related pages
How To Make Diamond-shaped Earrings Out Of Beads | How To Decorate Hoop Earrings With Beads