- MONKEYDOIT LINKS
- Home
- Beading & Jewelry Making
- Clay Basics
- Fun Paper Crafts
- Home Decor
- Projects with Fabric
- Easy Crafts For Kids
- Arts & Crafts Ideas
- Search
- OTHER SITES
- Sleewee
- Worklooker
- Jobspector
Roller-Printed Ring
by Jacqueline Gikow
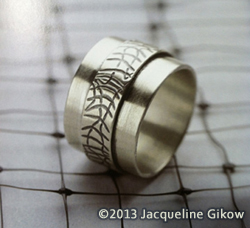
A silver roller-printed ring.
Silver is a pliable metal, which can be scratched and dented easily. In order to make silver stronger, it can be mixed with harder metals. Any metal can be used, but the most common is copper. Copper strengthens the toughness of silver without affecting its attractive coloring and shine. The largest quantity of silver used for jewelry has about 7.5% copper in it and is called “sterling silver”.
Texturing Metal for the Roller Printed Ring
There are many different techniques to alter the texture of sheet metal and add interest to your jewelry pieces. For roller printing, used in this project, a rolling mill is used to transfer the texture from another source onto a metal surface through pressure.
A roller-printed band attached to the surface of a wider, inner band makes this design particularly appealing. For additional contrast, enhance the texture with a black patina.
Materials, Tools, & Supplies for the Roller Printed Ring
Sterling silver rectangular wire - 1 x 16 mm
Sterling silver sheet - 18 gauge
Liver of sulfur
Hot water
Bench tool kit
Soldering kit
Ring mandrel
Design source for roller printing
Glass bowl
Rubber gloves
Fine steel wool (optional)
Instructions for Making a Silver Roller-Printed Ring
1. Using a ring mandrel, determine the length of metal needed for your ring size. Cut a rectangle on the 18-gauge sterling silver sheet that is 13 mm wide and the length needed for your ring size.
2. Use a jeweler’s saw to cut out the sterling silver rectangle. File the edges smooth.
3. Measure and mark a length of sterling silver rectangular wire that is approximately 3.5 mm longer than the length of your ring size. Cut the wire length with the jeweler’s saw and file the ends smooth.
4. Roller print the texture of a screen or other design source onto the rectangular wire, making sure that the action of the rolling mill doesn’t make the wire longer. If the length of the wire doe become extended, cut the wire back to the right size.
5. Bend the silver sheet and the printed wire into a circular band. The ends of each band must be absolutely flush. Use hard solder to join the ends of each band, and then dip the metal pieces into a solution of liver of sulfur and hot water. Rinse the metal. One at a time, place the bands on a ring mandrel and hammer them into perfect circles.
6. The longer, rectangular-wire band is the ring’s outer band. The shorter, silver-sheet band is the ring’s inner band. Place the wire over the inner band and make sure there’s a tight fit. If the outer band is too small, place it on the ring mandrel and hammer it with a rawhide mallet to lengthen it.
7. File and sand the solder joints on both pieces. Each piece should look as good as a finished ring.
8. Slide the outer band over the inner band. Center the roller printed wire over the inner band. Solder the outer band in place using easy solder. Then pickle and rinse the ring.
9. Sand both the inside and outside of the ring with 400-grit sandpaper to remove all fire scale.
10. Place the ring in a liver-of-sulfur solution to give the silver a patina, and then rinse the ring in water.
11. Sand the darkened ring with 400-grit sandpaper, making sure to leave the patina in the recess areas of the wire. Give the ring a final rinse with fine steel wool to create a satin finish.
Related articles