- MONKEYDOIT LINKS
- Home
- Beading & Jewelry Making
- Clay Basics
- Fun Paper Crafts
- Home Decor
- Projects with Fabric
- Easy Crafts For Kids
- Arts & Crafts Ideas
- Search
- OTHER SITES
- Sleewee
- Worklooker
- Jobspector
Creating Wire Jewelry
by Jacqueline Gikow
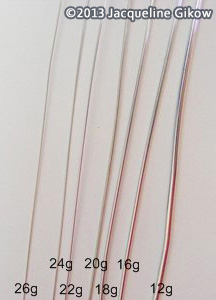
The picture shows some common jewelry wire gauges.
Jewelry Wire
Jewelry wire is available in a multiplicity of shapes, sizes, colors and metals. Making wire-based jewelry is entertaining and gratifying. With only your basic imagination, you can create wire jewelry in many techniques, which will accompany every outfit in your closet.
Wire can be crafted into chains, bent into stone settings and construct rings, pendants and earrings. Jewelry wire is available in assorted gauges, shapes and diameter sizes.
Thick jewelry wire. Available in 10- and 12-gauge, thick jewelry wire is the ideal choice for artistic or unconventional pieces. Thick jewelry wire results in a stunning look with a strong aesthetic.
Medium-gauge wire is very adaptable and can be applied to many jewelry projects. Medium gauge wire, such as 18- and 20-gauge wire, is useful for medium-sized jump rings and finishing clasps. 22-gauge wire works well for large bead holes. Medium-gauge wire is easy to use and is available in many colors.
Thin wire is graceful and works well for ornamental jewelry. 24-gauge wire is appropriate for wire-wrapping most beads. 26-gauge wire can be used for meticulous pieces like chain loops and wire wrapping small beads. 28-gauge and 30-gauge wire works well for wire weaving or crocheting. These gauges of wire are great for woven rings and delicate pendants.
Coiled Wire Earrings
Materials and supplies
20 gauge iron wire (85 ½ inches (2.2m)
Metal file
Round nose pliers
Chain nose pliers
Utility hammer
Brass or steel wire brush
Wax sealant
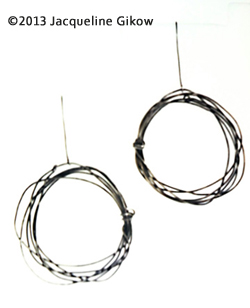
Instructions for Making Coiled Wire Earrings
1. Cut two 2 ¾ inches (7cm) lengths of iron wire and set them aside. These will be shaped into ear wires later.
2. Cut the rest of the iron wire in half. Each piece should be about 40 inches (101.6cm). Set one piece aside.
3. File one end of one of the long wire lengths smooth. Using the round nose piers, bend 1 cm of the wire into a small loop.
4. With your fingers, wrap the wire into a loose coil that measures approximately 2 ¼ inches (5.7cm)) in diameter. Continue wrapping until you have a total of six rounds formed, reserving about 1 to 1 ¼ inches (2.5 to 3.2cm) of straight wire at the end.
5. Using the chain-nose pliers, bend a right angle at the straight wire and wrap it two or three times around the circles to bind them together. Trim the end if necessary.
6. Open the small wire loop made in step 3 and close it around an adjacent wire. Hammer the coil closed, being careful where the wire overlaps.
7. To make the ear wire, file one end flat and form a small loop at the other end. Then bend the wire into a U shape at its center. Using the chain-nose pliers, bend the filed end of the ear wire at an angle. Bend the angled end of the ear wire, file away any burrs, and hammer the wire’s central part flat.
8. Select a point on the coil to be the top of the hoop. Choose one wire from the six rounds and attach the ear-wire loop to it.
9. Repeat steps 3 through 8 to make the second earring. Clean the earrings with the wire brush and seal them with the wax.
Related articles
Make a Sterling Silver Roller-Printed Ring | Precious Metal Clay for Jewelry | Make a Polymer Clay Necklace | Make Metallic Paper Beads