- MONKEYDOIT LINKS
- Home
- Beading & Jewelry Making
- Clay Basics
- Fun Paper Crafts
- Home Decor
- Projects with Fabric
- Easy Crafts For Kids
- Arts & Crafts Ideas
- Search
- OTHER SITES
- Sleewee
- Worklooker
- Jobspector
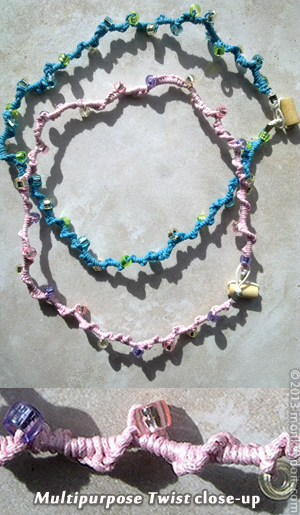
How To Make A Multipurpose Jewelry Piece, With A Twist
by Carly Van Heerden
Everyone has a hobby, something they enjoy doing in their spare time. Choosing a hobby is often the difficult part, but in most cases we choose our hobbies according to our available resources. For example, someone who enjoys riding a bicycle and spending time in the mountains will probably turn to mountain biking, if they can afford the equipment and live in a mountainous area. Elderly folk enjoy knitting or crocheting as neither requires too much physical effort. In fact, knitting is known to be therapeutic pastime.
Making jewelry is also a great pastime and can be a cost effective hobby if you’re making pieces for fun. Many tribes and cultures around the world use thong, leather strips and even hemp thread to make bracelets, necklaces or ankle wraps that they then wear themselves as decoration, or hand over to friends as gifts with sentimental value. A great example is the Beautiful Hemp Friendship Bracelet featured here on Monkeydoit.
This project is very similar. To make a Multipurpose Twist you will also be knotting twine, thong or colorful string together to make your piece, but you’ll be using only two pieces of string as opposed to three. And this is what creates the twist.
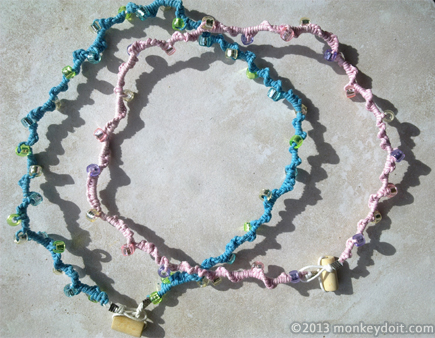
This easy-to-make jewelry piece is called the Multipurpose Twist because it can be used as a necklace, bracelet or an ankle wrap. It can be worn in water, too, which means you won’t need to take it off before you go swimming. It’s also very light and can be eye-catching, depending on the colors you choose to use.
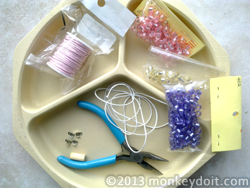
Materials Needed To Make Your Multipurpose Jewelry Piece:
1. 1 meter/40 inches white string or thong
2. 6 meters/20 feet thong or string in the color of your choice
3. Assorted beads (make sure the holes are big enough for the thong/string to fit through)
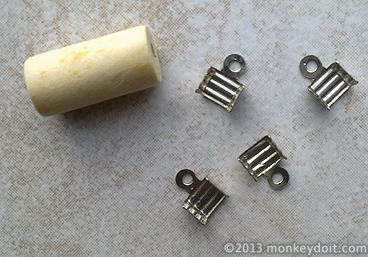
4. Two crimp clasps (silver, bronze or gold in color)
5. Jewelry pliers or long-nose pliers (from a jewelry or hardware store)
6. 1 x toggle-type bead
How To Make Your Multipurpose Twist Step By Step:
1. Cut your 6 meter/20 feet long piece of colored string into 3 pieces of 2 meters/79 inches each. This makes it easier to work with. If it’s too long it can be cumbersome.
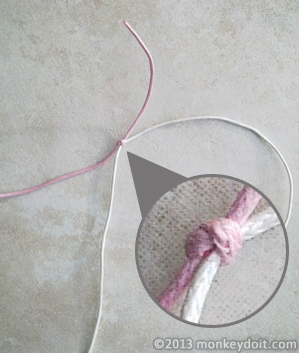
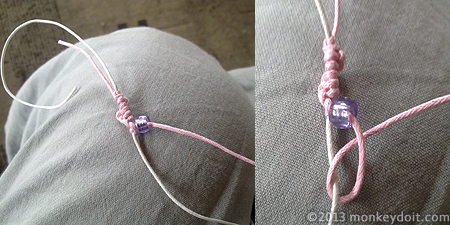
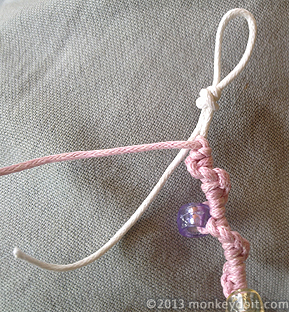
2. Place your 1 meter/40 inches long piece of white string between your knees to hold it taut. Leave a space of a few centimeters/inches open at the end, and then tie one end of one of your 2 meter/79 inches long pieces of colored string to your white string, as seen in the image below.
3. If you are holding the white string in front of you, gripping onto it with your knees, take the long side of the colored string, and then pull it to the right.
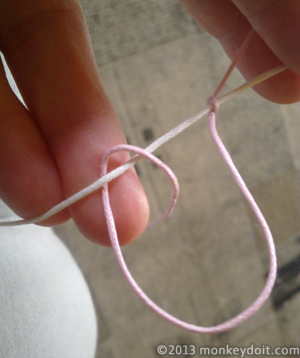
4. Form an arch with the colored string and then pull the colored string back towards the white string. Move it behind the white string then loop it under and then over the white string, and then back through the arch you created. Simply put; make a knot.
5. Continue to do this; pulling your colored string to the right, then make an arch, then pull the string to the left again then under and over the white string and through the arch. Ultimately you will continue to make a series of knots.

6. Remember to keep your white and colored string taut, and to push each knot as close to the previous knot as possible. Ideally you don’t want to see the white string beneath the colored string.
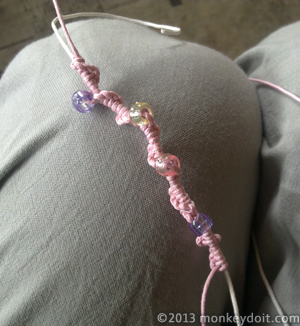
7. You will start to notice that the tiny knots in line begin to form a spiral. This is because you will constantly be making the knots by pulling your colored string to the right.
8. After the first 6 to 8 knots, slip a bead onto your colored piece of string and push it all the way up to the last knot, then continue to make the next knot as if the bead wasn’t there.
9. Continue to create your knots. You will soon discover that the white string needs to be turned in a clockwise direction on occasion, as the twist becomes more apparent.
10. If the phone rings or someone knocks at the door at this point, you may have to ignore it as keeping both strings taut now will be very important!
11. Continue around, threading a bead every 6 to 8 twists. You can use whichever beads you like, meaning you could choose to make an intricate Multipurpose Twist with highly decorative beads or one that can be worn as an everyday feature, like these in this article.
12. You will eventually run out of your 2 meter/79 inches long piece of string. You can then simply tie the second piece (of your 3 pieces) around the white string where the first piece has come to an end. Be sure to cover the tiny piece of remaining string from your first piece with the new piece, to keep the end hidden.
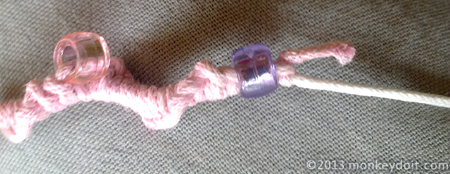
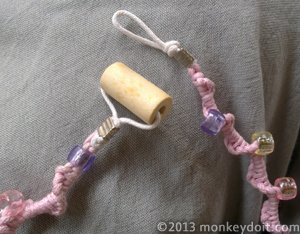
13. When you come to the end of the third piece (have used the full 6 meters/20 feet) of your colored string, tie the end to the white string in a series of normal knots to secure it. It should form a slight bulge which you can cover with a bead that has a big enough hole. The bead should fit tightly around your knot/bulge.
14. You will then be left with a short piece of white string on one end, and a longer piece of white string on the other.
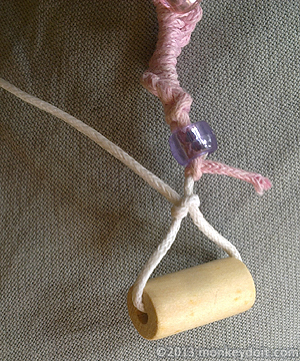
15. Get your clasps ready and your toggle-type bead. The toggle will serve as a fastener for your Multipurpose Twist.
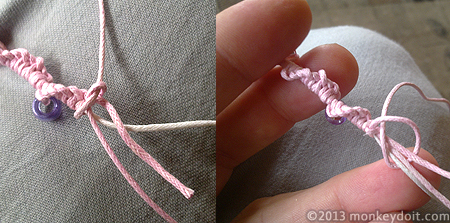
16. In the shorter piece of white string make a simple loop knot, making a big enough loop for the toggle-bead to fit through.
17. On the longer end of white string, tie your toggle-bead and then cut away any remaining string.
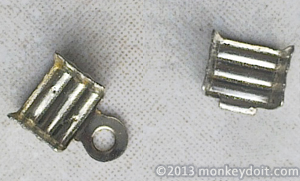
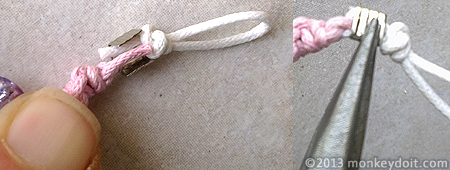
18. At both ends, the knots and very short pieces of string are sure to be visible. This is where you can use your clasps to hide these ends that would otherwise fray over time. In some cases the clasps may have tiny circles on their ends. You can cut them off as seen in the image below.
19. Place the ends of your Multipurpose Twist (the knots and shorter pieces of string) into the clasps as though placing a sausage into a bun, and then use your pliers to bend the sides of the clasps around the string.
20. Your Multipurpose Twist will now be complete and ready to fasten.
Making a piece like this could take you as long as an hour, perhaps an hour and a half, so be sure that wherever you choose to sit is comfortable. The overall costs shouldn’t be more than 2$ to 3$. Obviously if you want to use precious-stone beads or precious metals, it would cost a bit more.
Once it’s complete you can decide how you’d like to wear it. It could be a necklace, bracelet or ankle wrap. It’s your choice!
Enjoy yourself and be patient as this project certainly requires tenacity!
Related articles
How To Create a Beautiful Hemp Friendship Bracelet | How to Create a Bracelet with a Sliding Clasp