- MONKEYDOIT LINKS
- Home
- Beading & Jewelry Making
- Clay Basics
- Fun Paper Crafts
- Home Decor
- Projects with Fabric
- Easy Crafts For Kids
- Arts & Crafts Ideas
- Search
- OTHER SITES
- Sleewee
- Worklooker
- Jobspector
How To Make An Original Wrap-Around Arm Bracelet
by Carly Van Heerden

Just about every culture known to man has used jewelry as a way to convey messages. Whether it be a significant message through the use of hand-carved symbols or specific power gems, or just a message of beauty - jewelry has been a part of the human heritage for ages.
In this day and age, even if a jewelry piece doesn’t carry a specific message, in most cases any piece will say, “Look at me, aren’t I wonderful!”
There are so many different designs and types of jewelry available, but the best pieces are those we make ourselves. Why? Because when folks ask us, “Where did you get that?” it feels great to answer, “Oh this? I made it myself!”
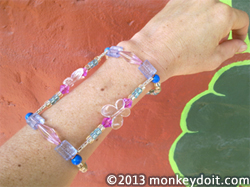
Also, when you make your own jewelry you can be sure that you’re getting just what you want, for any monies you may spend. The piece featured in this article is original and fairly simple to create. The materials shouldn’t cost you more than 4$ to 5$, depending on which types of materials you intend to use. Using gems and precious metals will likely cost a great deal more, but the piece in this article features copper wire and plastic and wooden beads.
Below you will see 2 examples which should give you a better idea of how much fun you can have when it comes to choosing which beads will best suit your design.
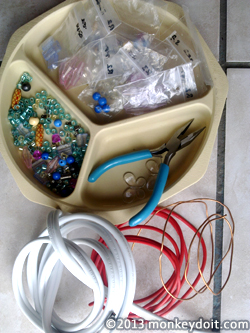
Materials Needed To Make Your Wrap-Around Arm Bracelet
1. 1.5 meters/ 60 inches thin electrical wire (copper cased in plastic)
2. Assorted beads of your choice, with 2 to 4 featured beads
3. Jewelry pliers or long-nose pliers (from a jewelry or hardware store)
4. A plate with compartments to keep your beads separated
How To Make Your Wrap-Around Arm Bracelet Step By Step
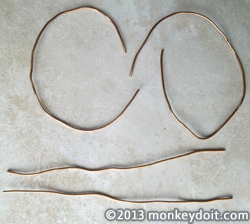
1. Remove the plastic casing/covering from your electrical/copper wire. Use the inside cutting edge of your pliers to gently cut around the plastic. You should be able to simply pull the plastic off the copper wire it covers.

2. Cut the copper wire into 4 pieces. Each piece should be at least 20 cm/8 inches in length.
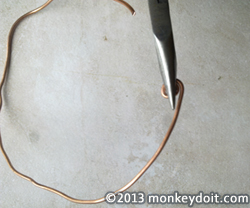
3. Hold one end of one of the pieces of wire tightly with your pliers. Then bend the wire around the very tip of your pliers to make a tiny circle.
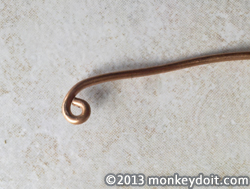
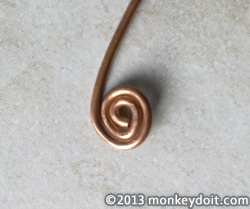
4. Hold the start of the circle/coil (flat sides) in your pliers and then continue to twist the wire by pulling it around with your fingertips, to make a perfect coil.
 |
 |
5. Keeping in mind that the wire should fit comfortably around your wrist, and that you will still need a coil on the other end (to keep the beads secured); measure the wire by wrapping it around your wrist to determine how many beads you will need to make your first bracelet. Then begin to thread your beads onto the wire, in your desired pattern.
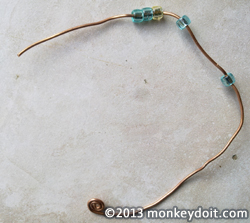
6. Once you have threaded sufficient beads (in a pattern) onto your first piece of wire, you will need to ‘close’ your first bracelet by creating another coil on the still ‘open’ end. You will have left a piece of wire open for this purpose.
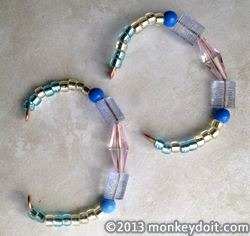
7. You will be left with the first bracelet for your Wrap-Around Arm Bracelet, as seen in the image below.
8. Now, as you can see in the image of the final product, you will need 2 bracelets like this. So, your next step will be to repeat the steps above in order to make bracelet 2. Afterwards you should be left with 2 identical bracelets. Keep the second a little longer as it will need to fit further up your forearm, but keep in mind that the size is not too important as wire can bend to shape.
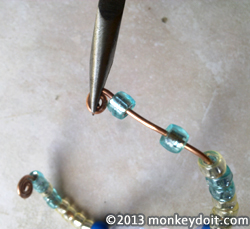
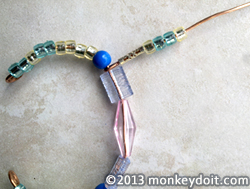
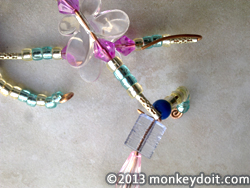
9. Next you will want to join the 2 bracelets creatively. Take one of the leftover pieces of straightened copper wire, and bend one of the ends (making a hook) around one of the bracelets - not directly in the center; there should be a gap between this arm/extension and the second arm (which you will create next). Then, using your pliers, fasten the hook around the bracelet so that it fits tightly.
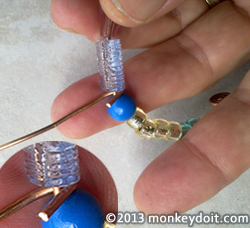 |
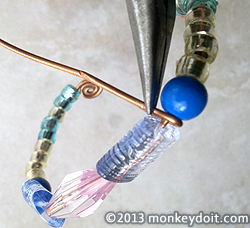 |
10. Begin to thread your beads onto the extension/arm, keeping in mind that a featured bead in the center of the design will look great.
11. Once you have placed the beads on one arm/extension, simply bend the end of the wire so that the beads do not fall off the arm, and then repeat the above 2 steps to create a second arm. Keep the 2 arms a distance apart, but not by longer than a few centimeters/inches.
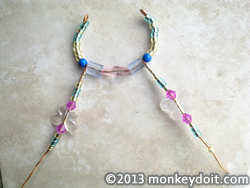
12. Next you will want to hook the extended arms to your second bracelet, joining the 2 bracelets together. Make your hooks and then tighten the hooks around the second bracelet. Try to keep beads with bigger holes on either ends of the extensions/arms; they can cover the very short piece of wire that will extend from the hooks.
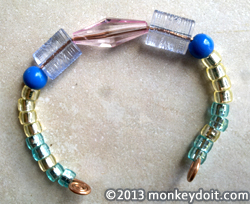
13. Your Wrap-Around Arm Bracelet should now be complete. Of course the wire may be bent in certain places, because it’s difficult to work with pliers and beads without bending the wire slightly somewhere. But, of course, you will be able to reshape your wire bracelet to fit onto your arm beautifully.
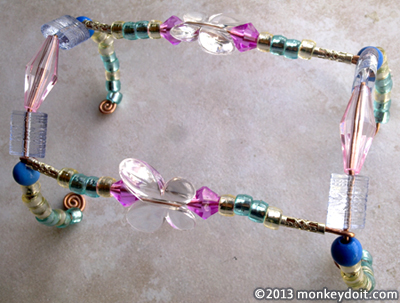
14. Finally, wrap your Wrap-Around Arm Bracelet around your wrist and upper forearm, pressing the wire down to keep the bracelet secure.
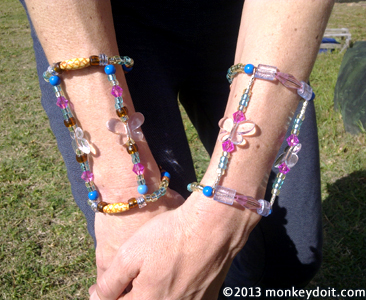
This is certainly a great creative project, but keep in mind that your fingers and hands should be warm when you begin; pressing pliers closed with cold hands can lead to aches and pains in your fingers and palms! As you can see in the image above, you can experiment with various beads and, of course, you’ll even be able to make the perfect Wrap-Around Bracelet to suit a special outfit. Other than that, they’re original and fun, and when worn will express this side of your nature to all those who see them.
Have fun!